Control Templates
📑 Control Templates in the IoT Server Dashboard are reusable defaults that controls inherit through their Base Template selector. Use templates to define shared display names, descriptions, categories, localizations, and metadata once and have many controls pick them up automatically.
📍 Accessing Control Templates
This page requires an account with the Admin or Engineer management role.
- Log in to the IoT Server Dashboard with your management credentials.
- Open Controls & Areas in the left sidebar.
- Click Control Templates to open the templates list.
📋 Viewing Control Templates
The Control Templates list shows one row per template.
The table includes the following columns:
- Name — The template name. Click the name to open the template details page.
- Controls — The number of controls currently using the template as their Base Template.
- Type — The control type the template applies to (light, lock, hvac, cover, toggleable, sensor, button, scene, or remote). A template is only selectable from controls of the same type.
- Created At — Hidden by default. Enable it from the column settings to display the row creation timestamp.
Each row also exposes the Enabled toggle in the actions column.

🔍 Searching, Filtering, and Pagination
- Enter text in the Search field to narrow the list by template name.
- Open the Type filter to limit the list to one or more control types.
- Click Clear filters to reset all selected filters.
- Use the column sort arrows on Name, Type, or Created At to sort the list.
- Use the pagination controls to move between pages and to change the rows-per-page value.
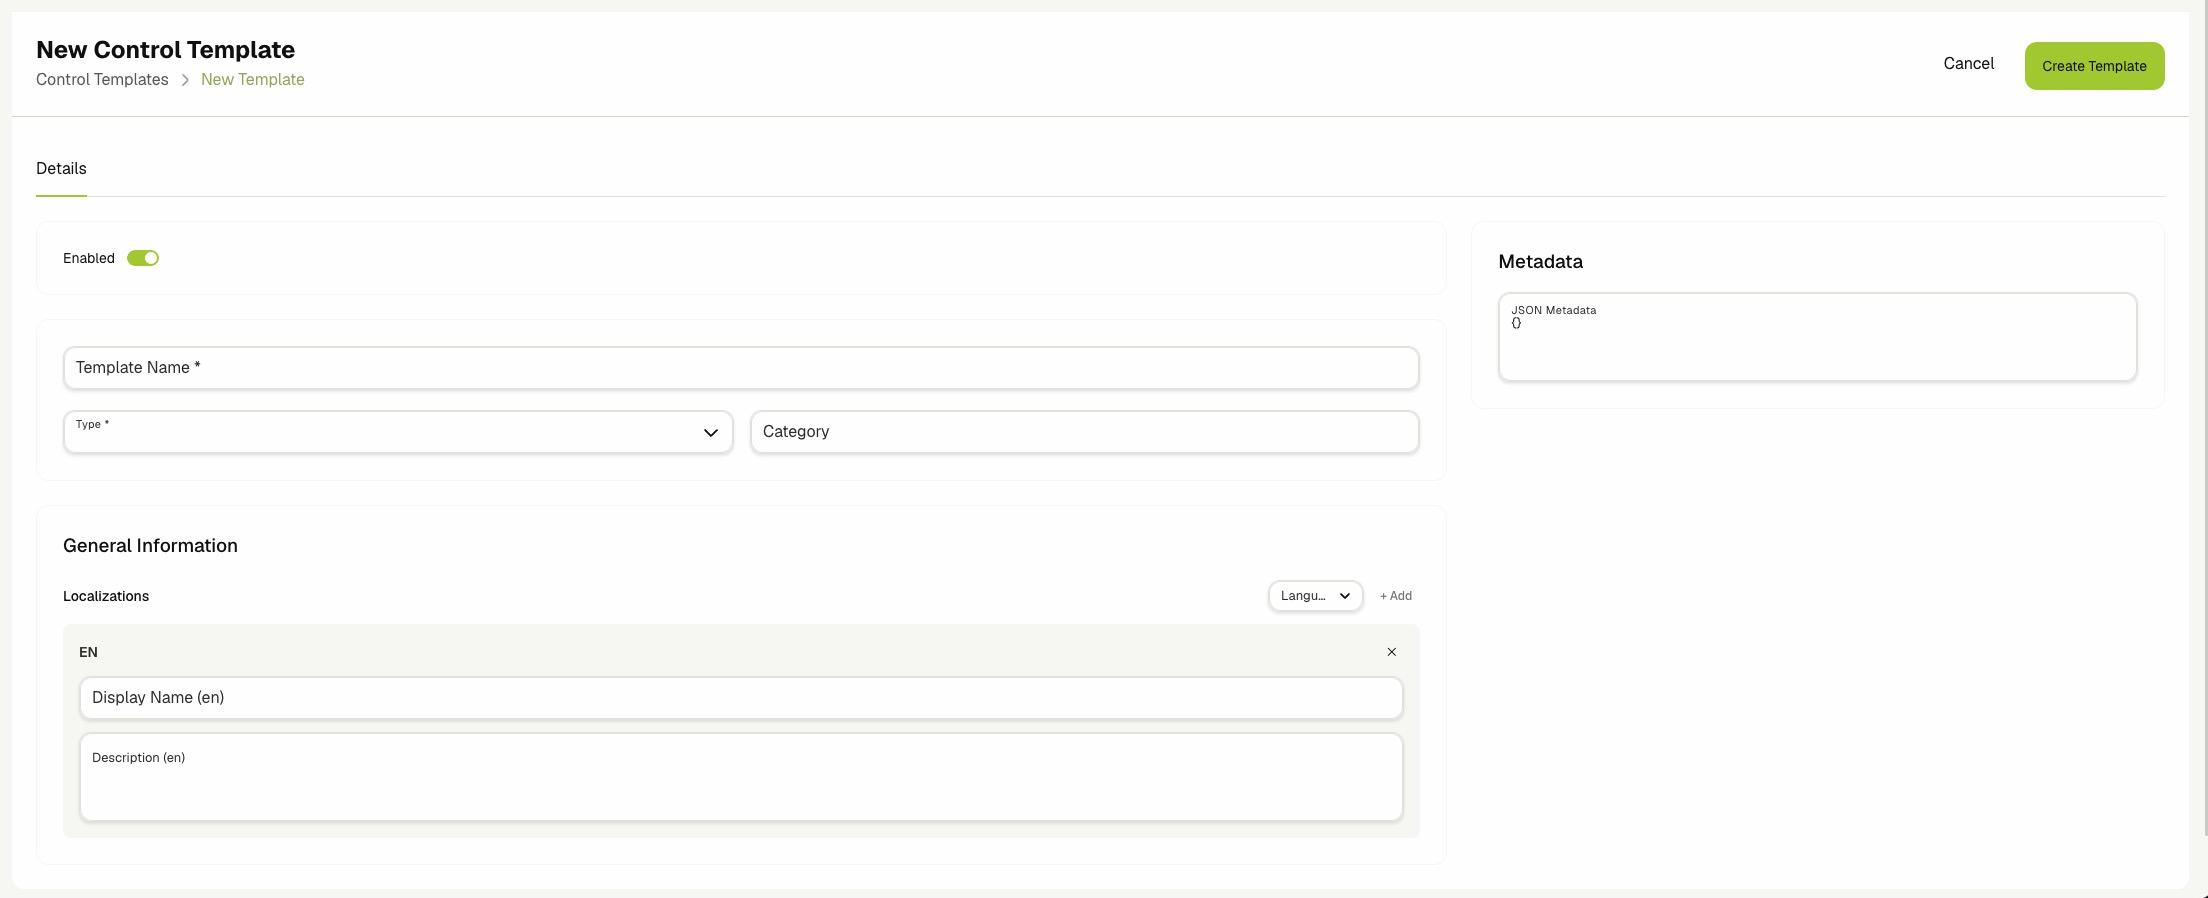
➕ Creating a Template
- Click Create Template on the list toolbar.
- Fill in the required fields:
- Template Name — A unique, human-readable name shown in the Base Template selector on controls.
- Type — The control type this template applies to. The selected type locks the templates that controls of that type can pick from.
- Fill in the optional fields:
- Category — A grouping label inherited by controls that select this template.
- General Information — Provide localized Display Name and Description values per language. The English entries become the canonical fallback used when a language is not provided.
- JSON Metadata — Free-form structured data merged into every control that selects this template. The value must be valid JSON.
- Toggle Enabled to control whether new and existing controls can resolve defaults from this template.
- Click Create Template.
- The new template opens in view mode. Confirm that the metadata, localizations, and category appear as expected.
Start with the smallest possible template: just Name, Type, and a default Display Name. Add categories, descriptions, and metadata incrementally as more controls reuse the template.
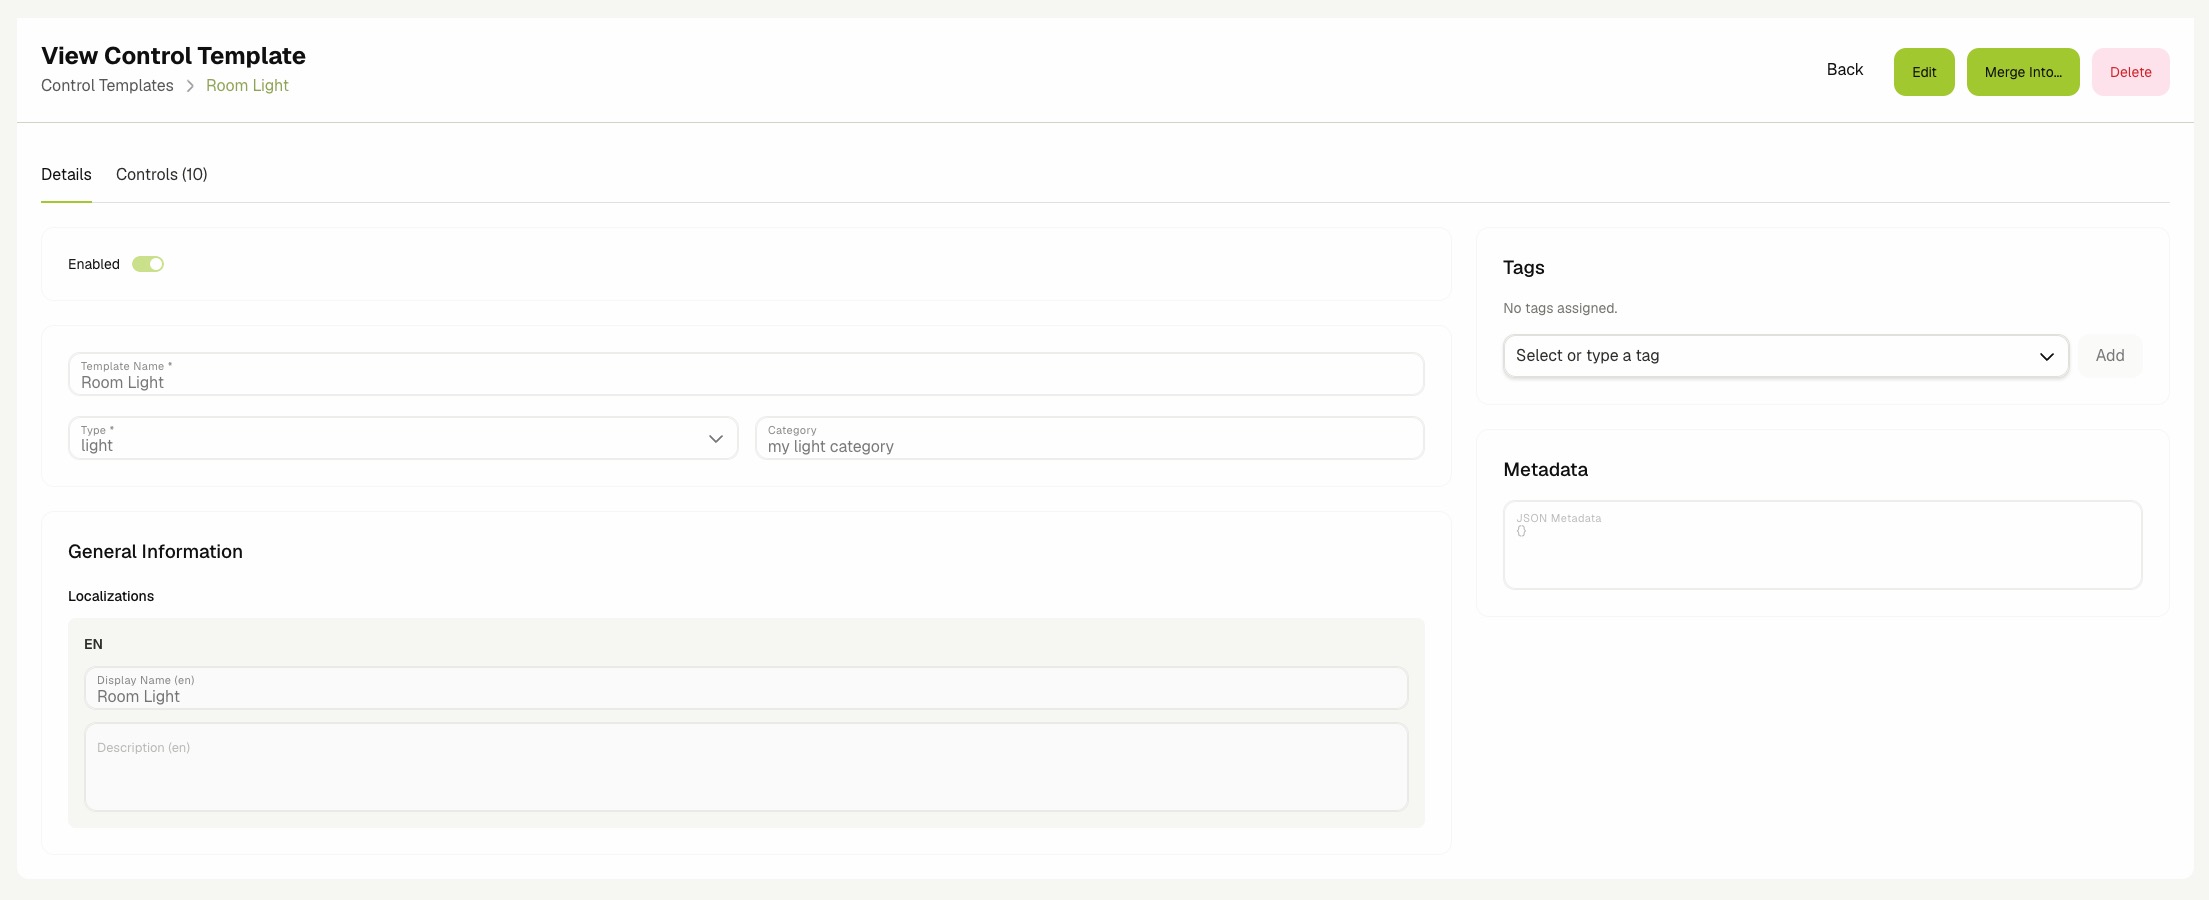
✏️ Editing a Template
- Open the template details page and click Edit, or click Edit on the row in the list view.
- Update any fields on the Details tab.
- Click Save Template.
- Confirm that the success alert appears and the new values are reflected in the view.
Controls that are linked to the template are automatically updated and will show the updated template values if the control didn't override these values.
🏷️ Managing Tags
- Open the template in view mode or edit mode.
- In the Tags card on the right, type a tag name and select it from the suggestions, or press
Enterto create a new one. - Click the remove icon next to a tag to detach it from the template.
🚦 Enabling and Disabling
- Locate the template in the list view.
- Use the row toggle to set the template to Enabled or Disabled.
- Confirm that the row reflects the new state.
Disabling a template does not remove it from controls that already link to it; the controls keep their cached template. Disable templates that you plan to retire, then migrate the linked controls using Merge Into feature.
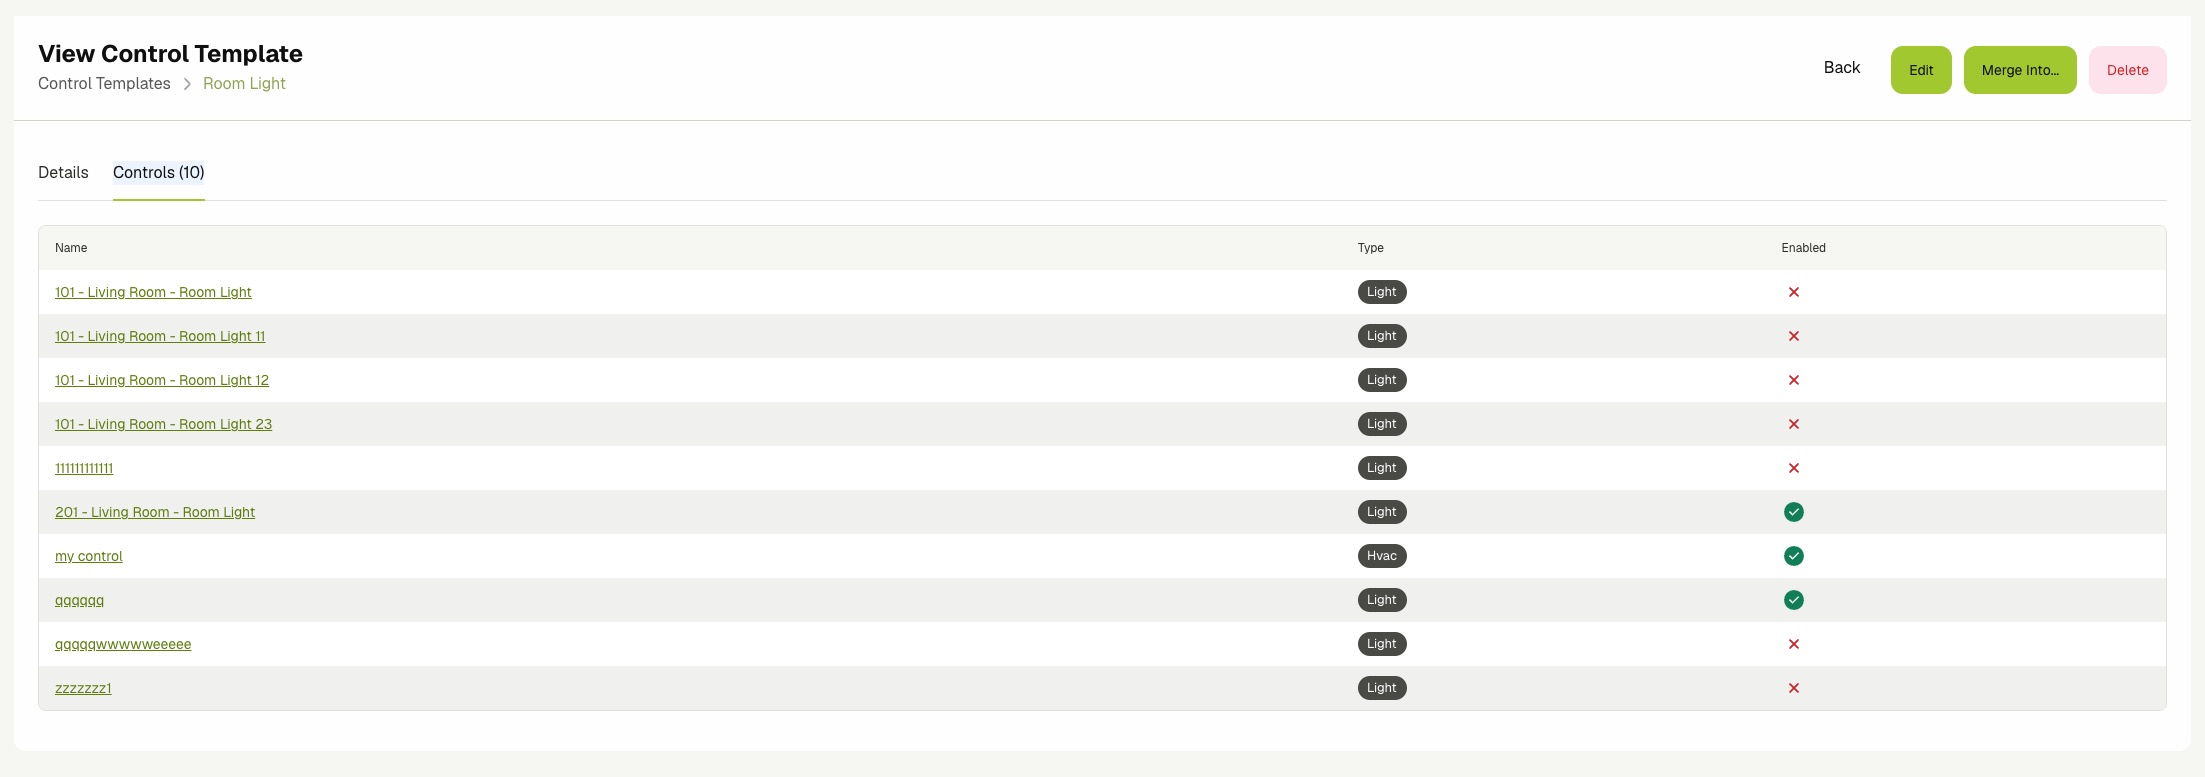
🧩 Viewing Linked Controls
-
Open the template details page.
-
Click the Controls tab. The tab label shows the current count, for example Controls (4).
-
Review the table of controls that select this template as their Base Template. Each row shows the control name, type tag, and enabled state.
-
Click a control name to open it in the Controls page.
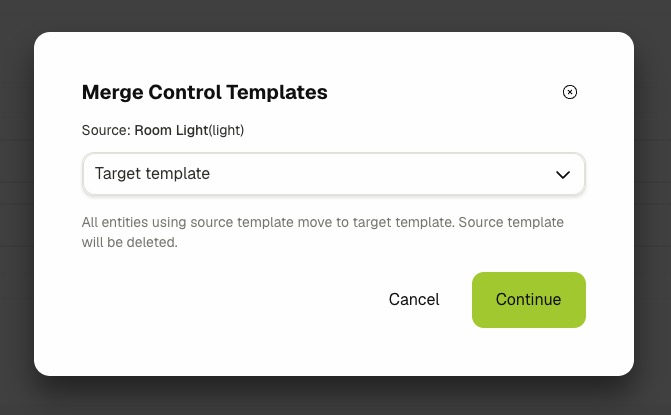
🔀 Merging Templates
Use Merge Into to consolidate two templates into one. Every control that selects the source template is reassigned to the target template, and the source template is deleted.
A merge deletes the source template after migrating its controls. This action cannot be undone. Confirm the target template carries the defaults you actually want before continuing.
-
Open the source template details page, or locate it in the list.
-
Click Merge Into in the header (detail page) or in the row actions (list view).
-
In the Merge Control Templates dialog, start typing the target template name and select it from the dropdown. Only templates of the same Type are offered.
-
Review the source name, the target name, and the warning text.
-
Click Continue.
-
Review the final confirmation dialog and click Merge to apply the change, or Cancel to abort.
-
Confirm that the success alert appears and the source template no longer appears in the list.
🗑️ Deleting a Template
Deleting a template that is still linked to controls is blocked by the dashboard. Either re-link those controls to a different template first, or use Merge Into to migrate them in one step.
- Open the template details page, or locate the template in the list.
- Click Delete in the header, or click Delete on the row.
- Review the confirmation message.
- Click Delete to confirm.
- Confirm that the template is removed from the list.
Related Docs
- Controls — Pick a template from the Base Template selector when creating or editing a control.
- Devices & Entities — Manage the integration entities that controls link to.
- Activity Logs — Audit template create, update, merge, and delete actions.
- Integrations — Connect the external platforms that surface device types templates apply to.