Inventories
Manage Inventories & Sub-Inventories
Inventories are used to track and manage materials across various locations. In this guide, you'll see how you can manage inventories and sub-inventories.
Creating an Inventory
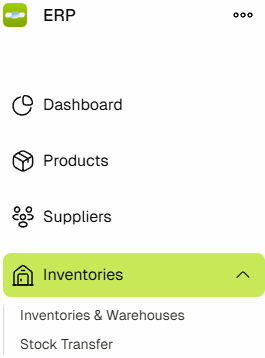
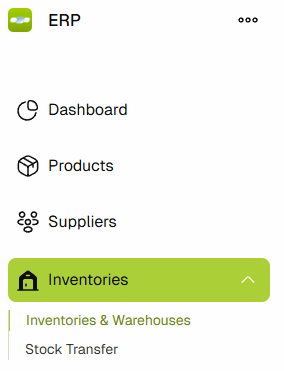
- Navigate to Inventories & Warehouses by clicking on the Inventories link in the sidebar.
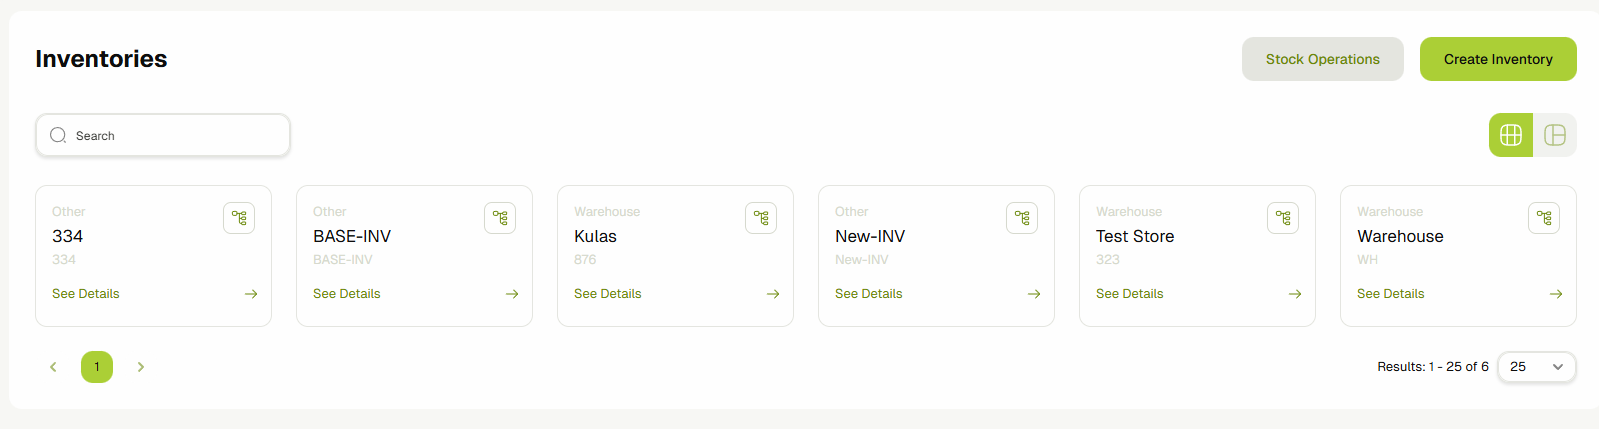
- You'll now see a list of all the parent inventories that exist in the system.
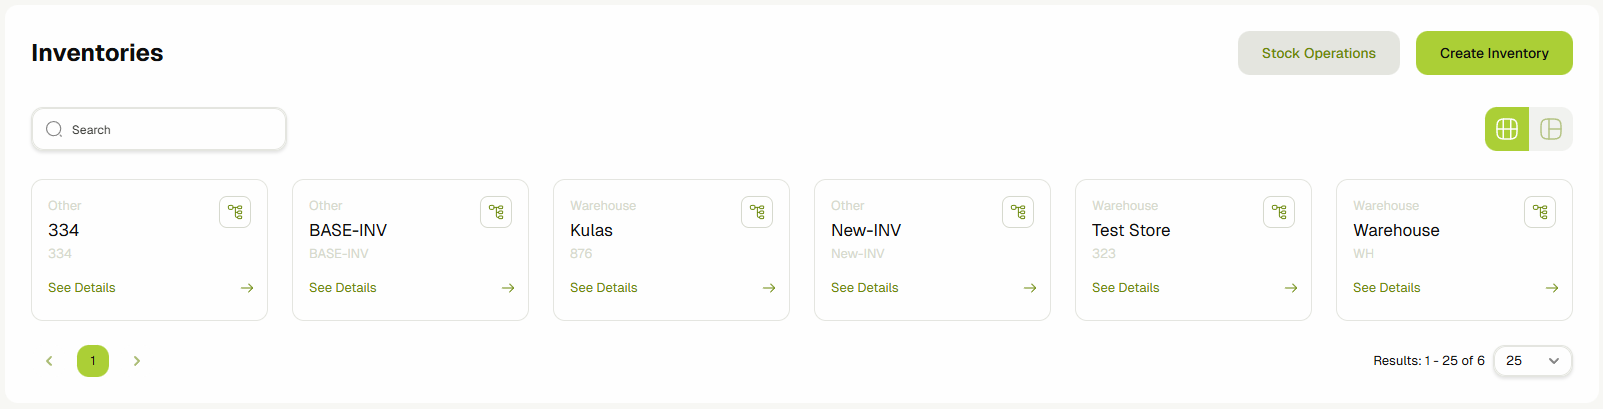
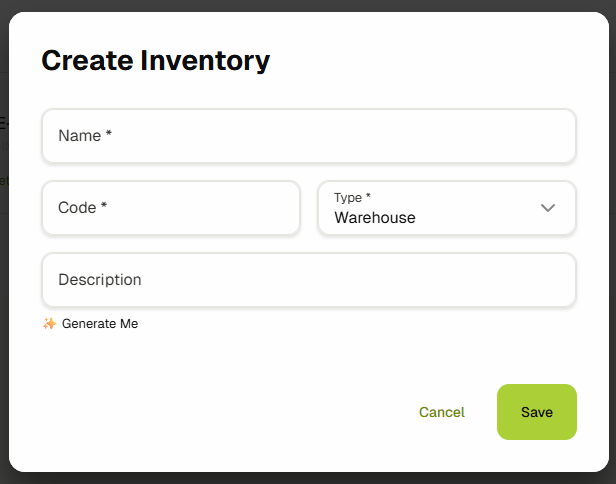
- Click the Add Store button to open the inventory add form. Fill out the form and click Save Store to save this inventory.
- Once saved, your newly added Inventory will appear on the main Inventories page and will also be available for selection in the Inventories dropdown on other pages.
Once you have an inventory, you can perform operations like adding, transferring, & removing stock. You can also set up stock alerts to receive notifications when stock quantity or expiry thresholds reach a specified value.
Creating a Sub-Inventory
Each inventory can have multiple sub-inventories. Think of the main inventories as a "Warehouse" or a "Store," and each sub-inventory as a section, rack, or shelf.
To create a sub-inventory:
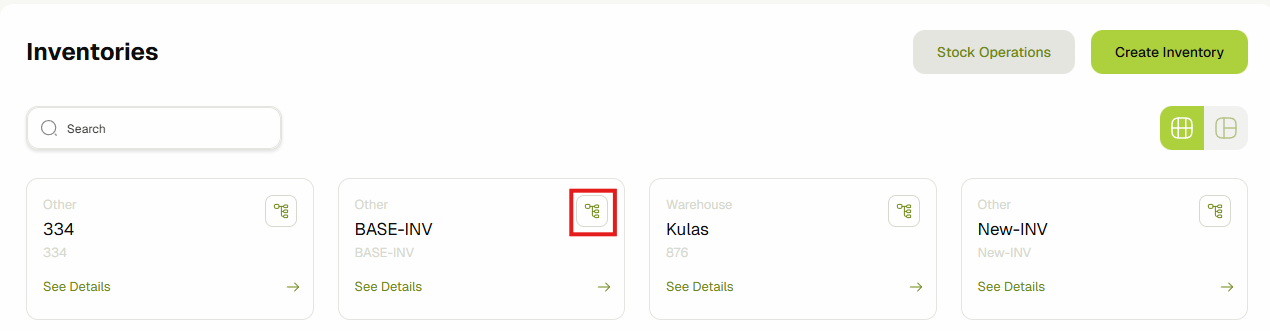
- Click on the Warehouse Designer button on the main inventory card.

- Alternatively, access the Warehouse Designer from the Inventory details page.
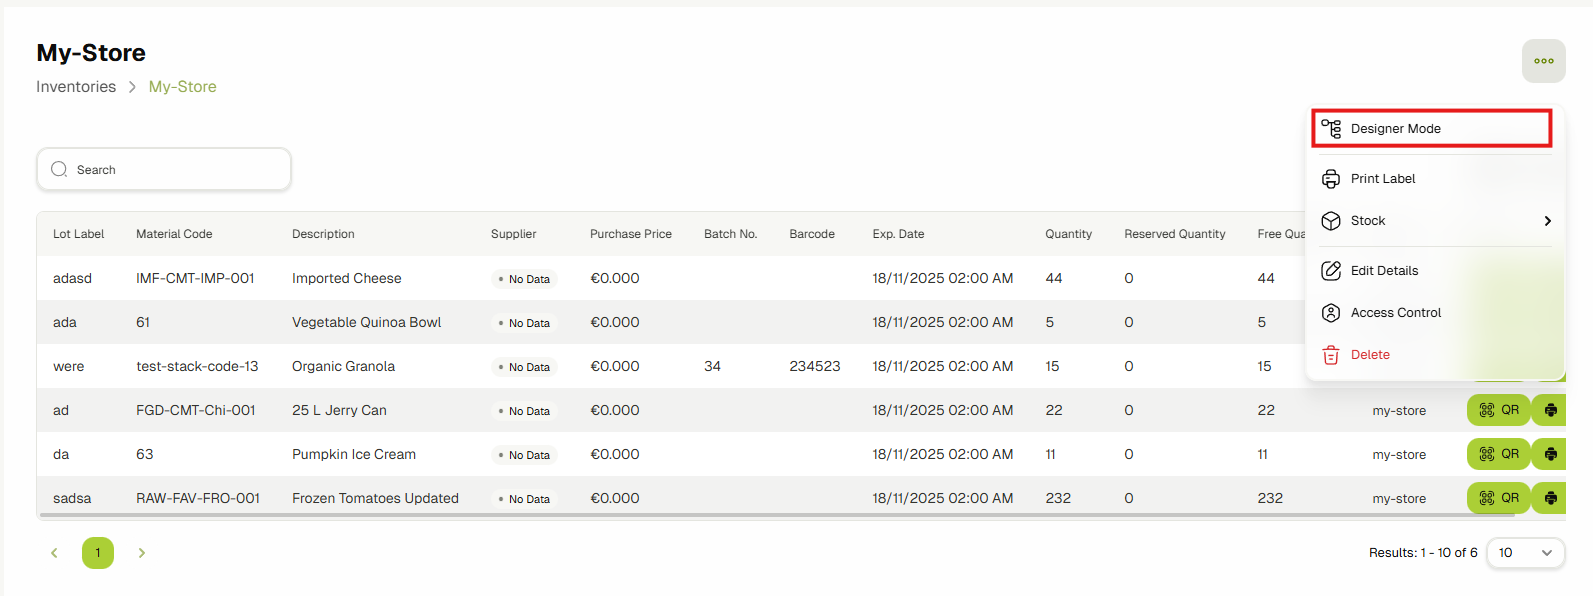
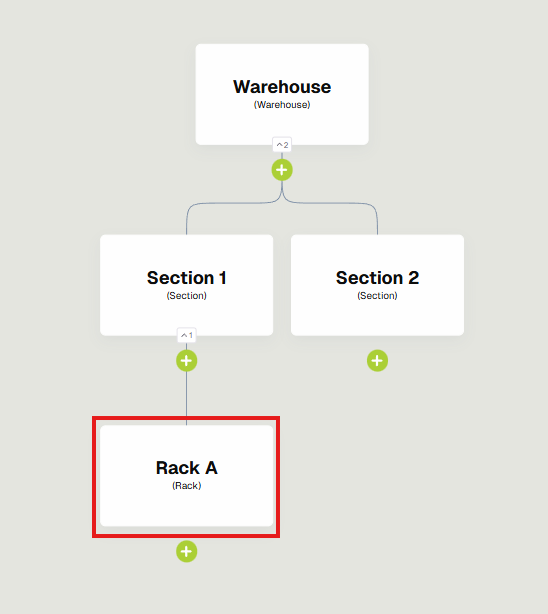
- On the Warehouse designer page, create a nested inventory by clicking the "+" button.
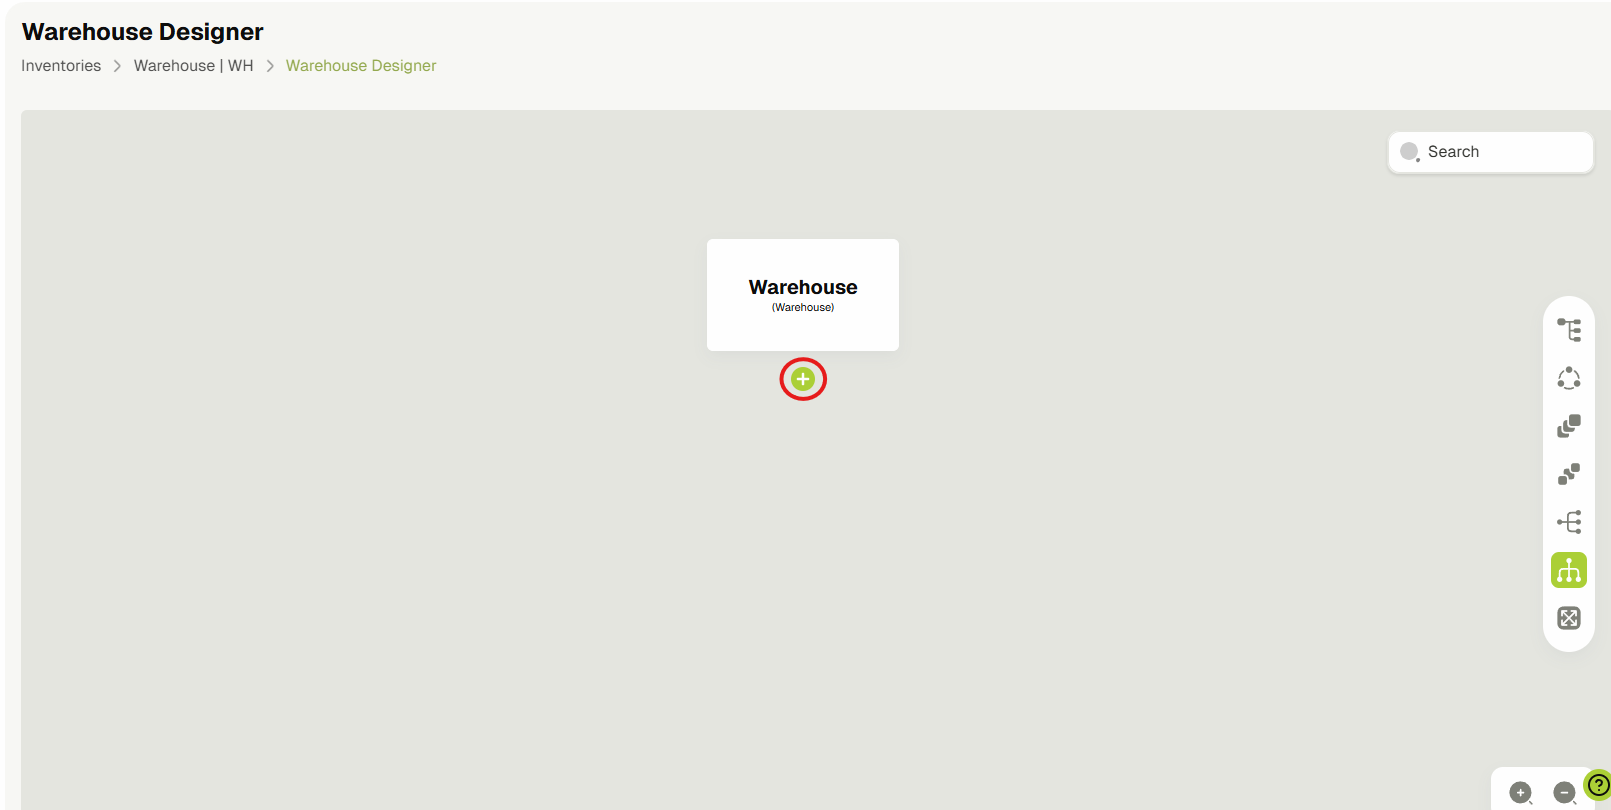
- A form will open. Fill it out and click Create.
 A new sub-inventory will be created.
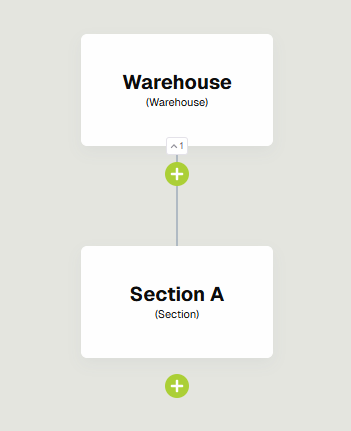
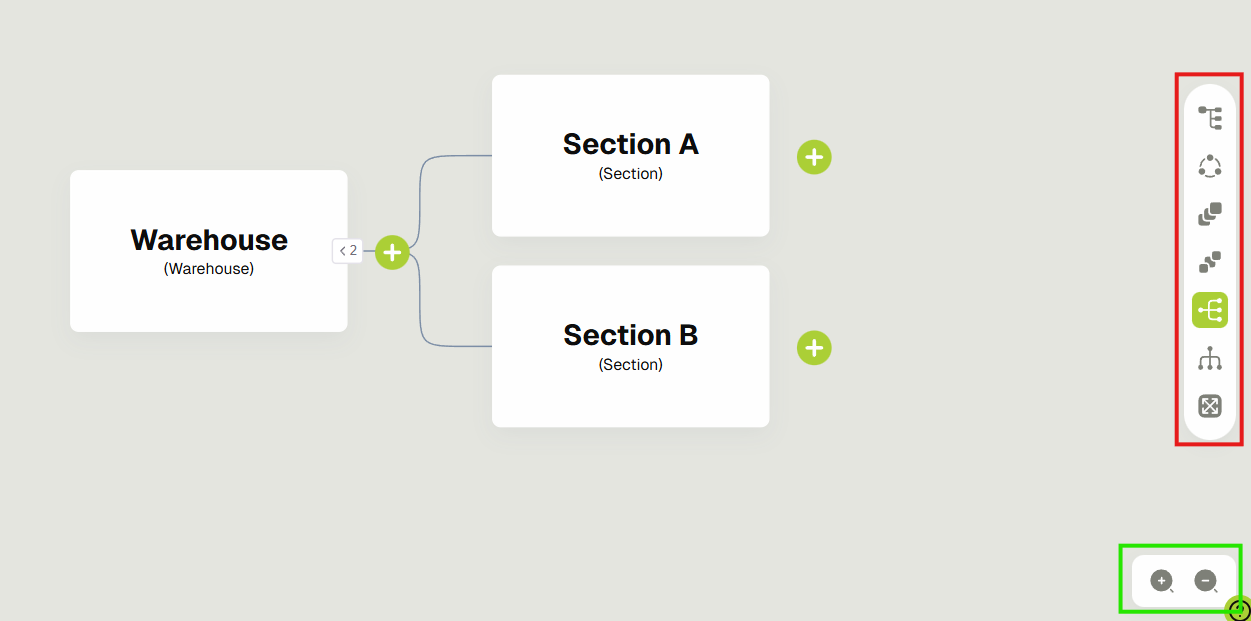
- You can create multiple sub-inventories nested within each other by clicking "+" below the inventory card.
You can also expand, collapse the nested inventories by clicking the expand/collapse button (highlighted with purple).
You can also change the view structure of the nested inventories by using the options on the right menu (highlighted with red).
You can also zoom in/out using the zoom buttons available on the bottom right of the screen (highlighted with green).
Update Inventory / View Stock Levels
To update an inventory, set access controls, or view its stock levels, click on the See Details button.

On this page, you can Update the inventory details or Delete the inventory itself.
You can also set "Access Controls" for this inventory by selecting roles and users. Only those users or users having those roles will be able to:
- Review the materials and either reject or approve them for this inventory
- Select this inventory in some of the inventory dropdowns available across ERP
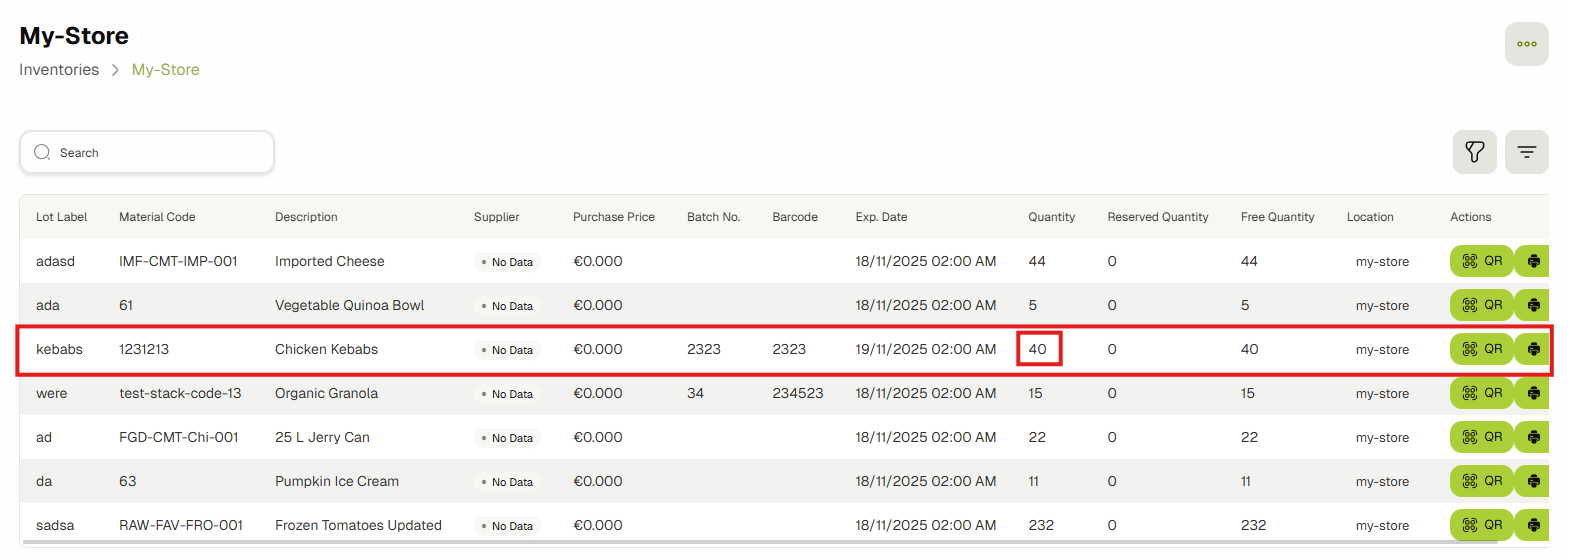
The "Store Stock Levels" table shows an overview of the stock levels at this store, listed out as Lots, where a Lot is the most unique variant of a Product/Material (a single Product/Material can be two different lots if purchased at two different dates/prices).
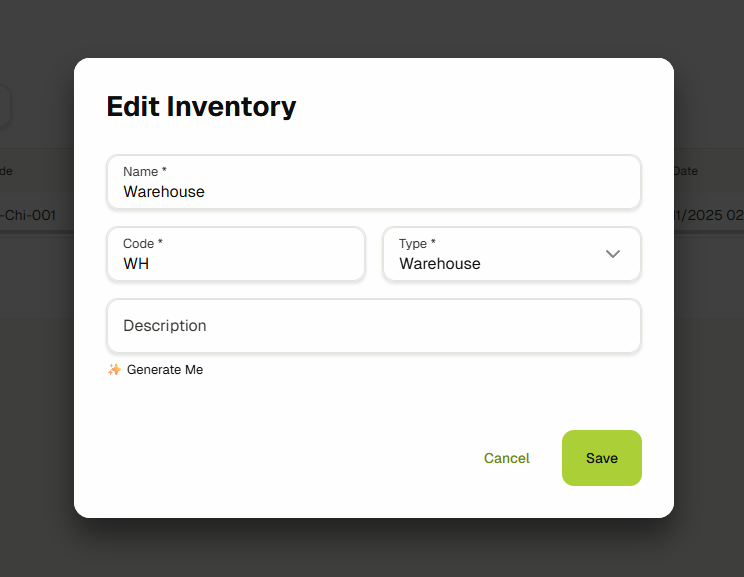
If you instead want to update or delete any of the sub-inventory, you can open up the "Warehouse Designer" and click on the Inventory card.
It will open up the Edit sub-inventory form for you to make any changes in it. You can also delete the sub-inventory by clicking on the "Delete" button.

Conclusion: After following this article, You’ll be able to create and manage Inventories and sub-inventories easily.
Stock Transfers
In this guide, you'll learn about Stock Transfer. It is the process of moving materials between inventories. Before following this guide, make sure you have at-least two inventories in your system. Click here to learn more about managing Inventories.
-
Navigate to the Stock Transfers by expanding the Inventories sidebar link and clicking on the Stock Transfers link.

-
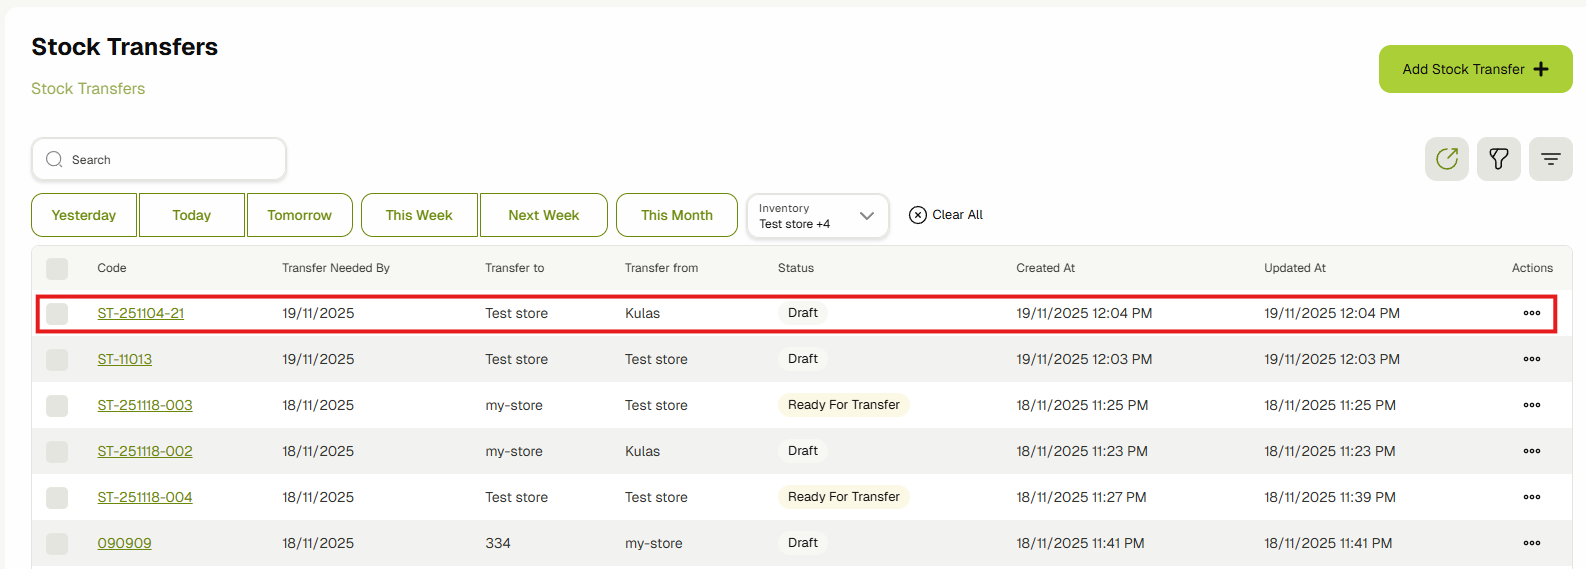
You'll see a list of all the Stock Transfers that are currently in progress or finished on this page.

-
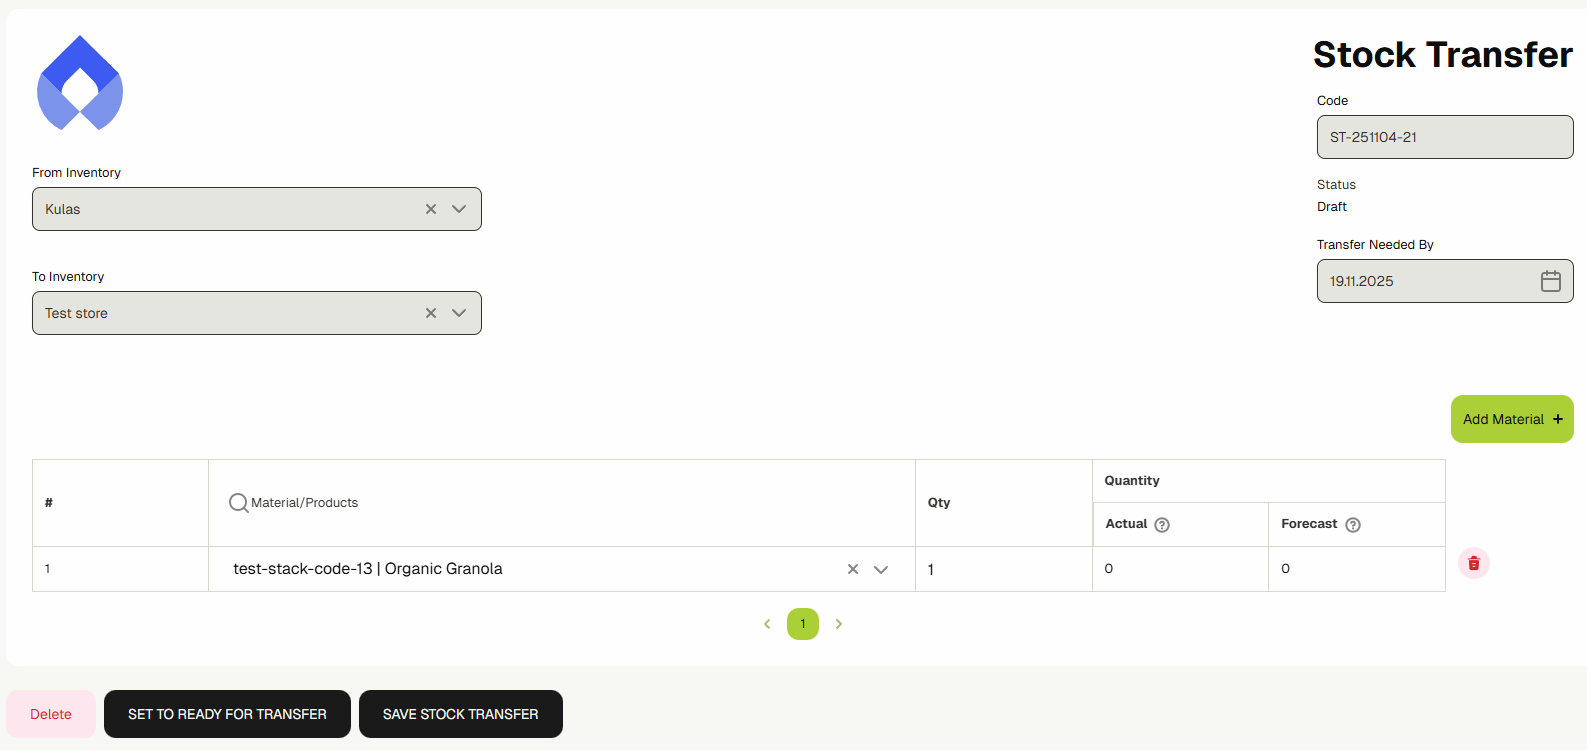
Click the "Add Stock Transfer" button to open up the stock transfer document.
- 3.1. Select the "From Inventory".
- 3.2. Select the "To Inventory"
- 3.3. Set the date in "Transfer Needed By"
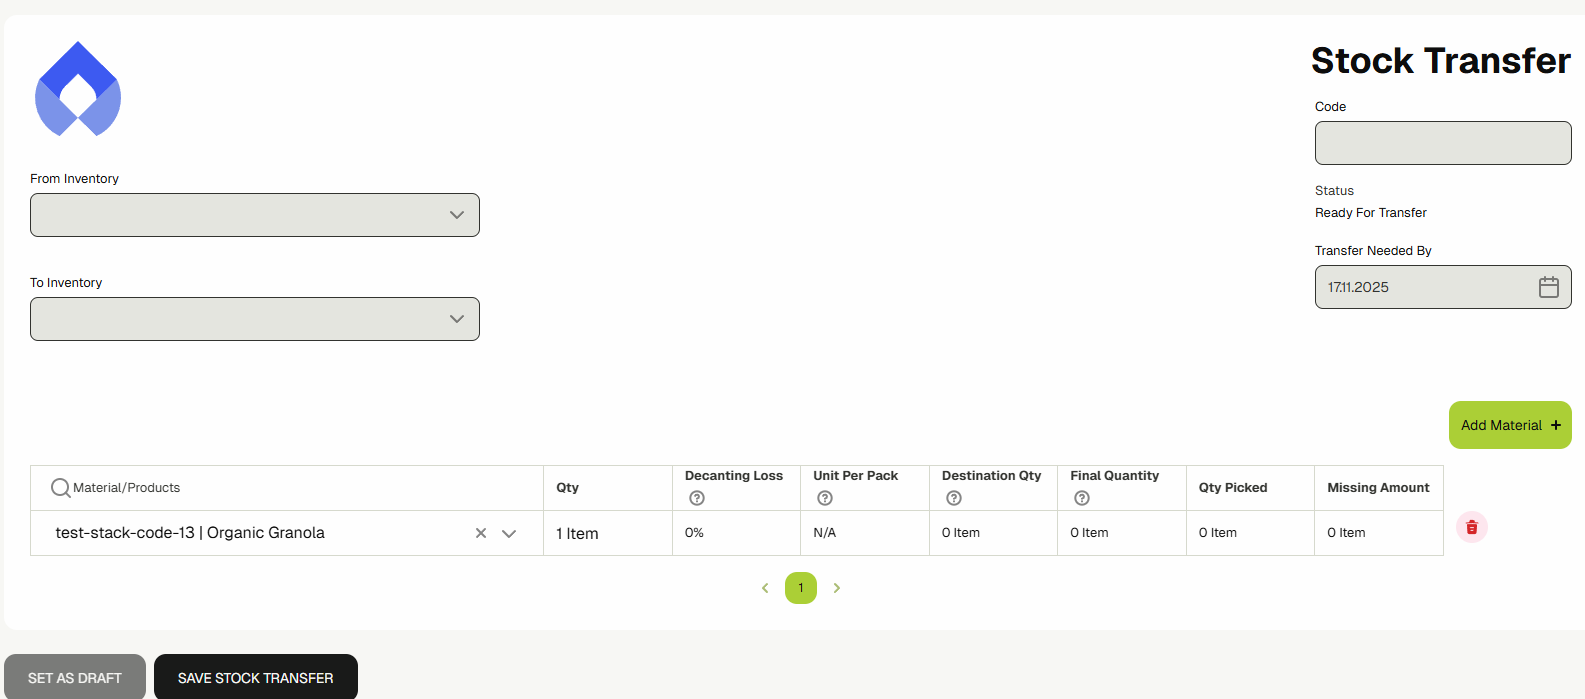
- 3.4. Click "Add Materials" to add a material row. Search and choose the required material in the material field.
- 3.5. The system will show you the "Actual" and "Forecasted" quantity of that material for the "From" inventory.
- 3.6. Enter the quantity that you want to transfer from "From" inventory to "To" inventory.
- 3.7. Click the Save Stock Transfer to create the transfer document.
infoIn the From Inventory list, an inventory will only be shown to you if your user or your user role have access to that inventory.
infoThe Materials dropdown field in the Materials table will only show those materials that are available in the From Inventory.
-
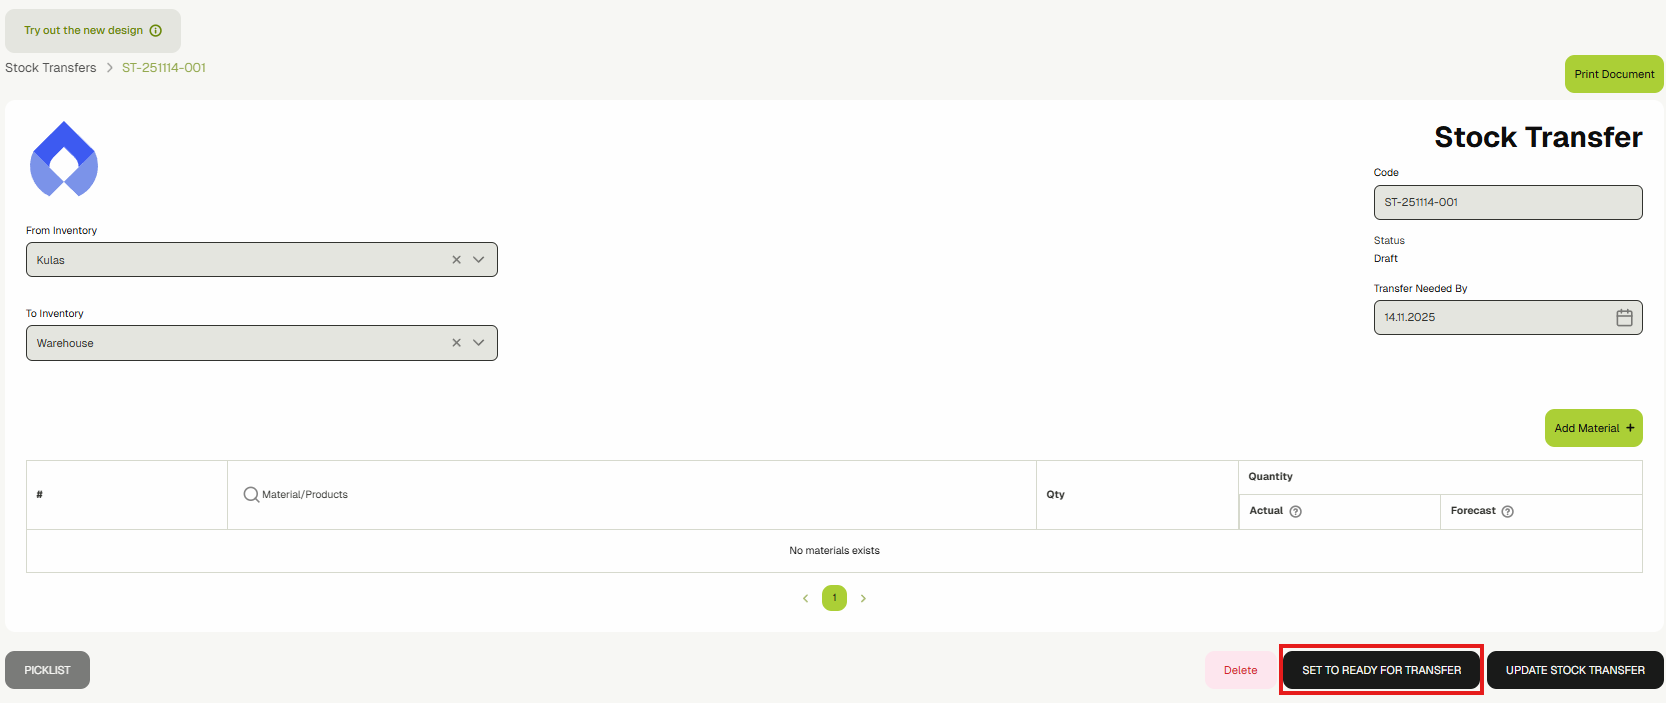
Your transfer document will now be created and Its status will be "Draft".
You can make modifications (add/remove materials, update quantities, etc.) while It's in draft by simply clicking the Edit icon and updating the Stock Transfer document.
-
Once you're satisfied with the changes, click the "Set Ready To Transfer" button. It will change the status of your document to "Ready To Transfer" and It won't be editable in this state anymore.
-
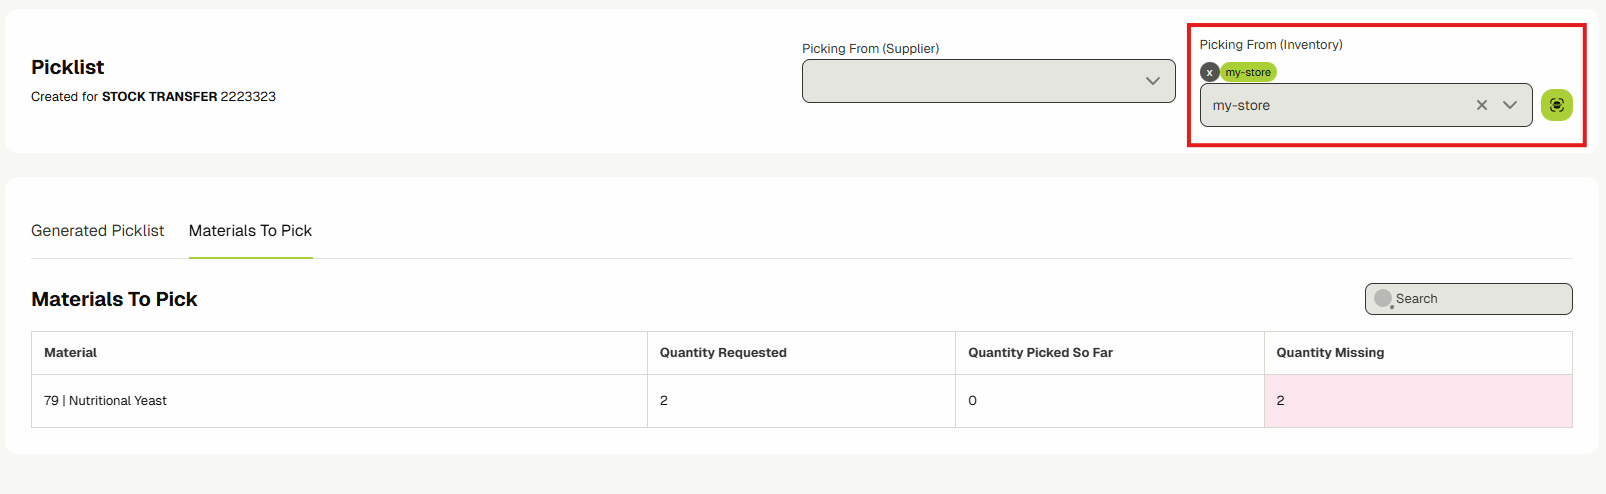
Once done, click the "Picklist" button to take you to the picklist page and start reserving the materials from the "From" inventory.
 info
infoYou can narrow down from where you want to transfer items by selecting and searching for sub-inventories in the input Picking From
-
In this Picklist view, you will see two sections, "Materials to Pick" listing out the products and materials, and the "Generated Picklist" which should tell you exactly where to find each item.
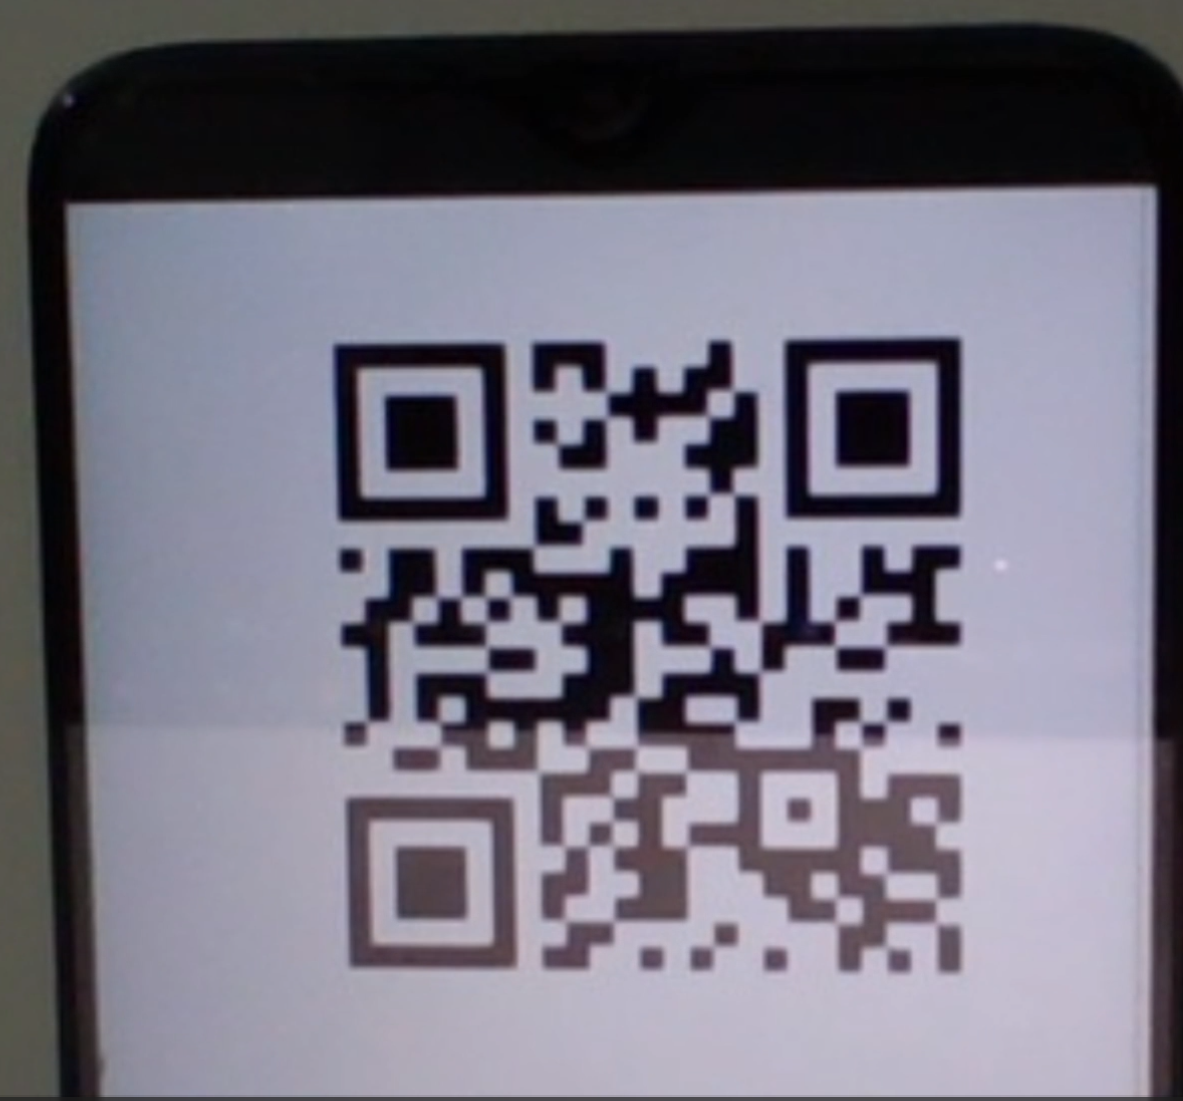
Click the "Reserve" button to reserve the materials. It will load up a camera view.

The camera may take a few seconds to load the first time...

Scan the lot label "QR" code. The material will be reserved and you'll see the "Release" button next to the reserved material.
 info
infoWhether you're required to scan QR code for reserving the materials depends on whether the Picklist Reservation Verification is toggled on or off in ERP settings for your tenant.
-
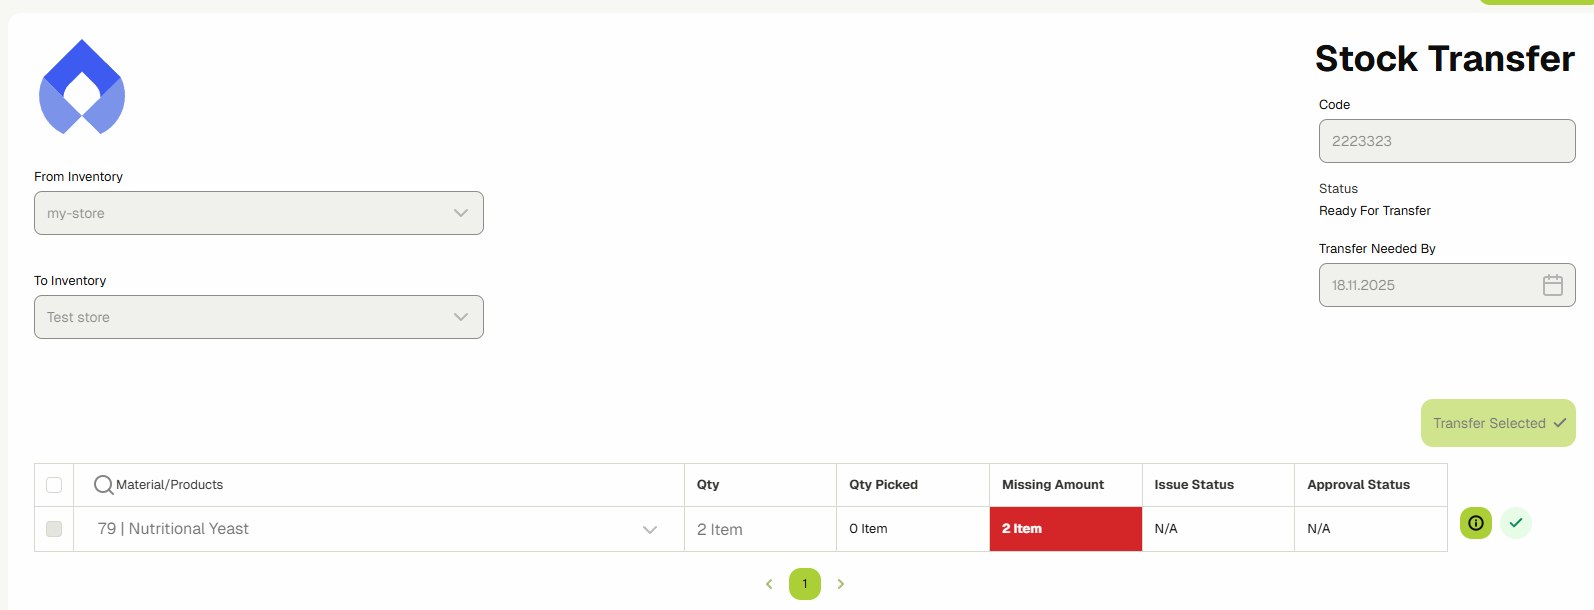
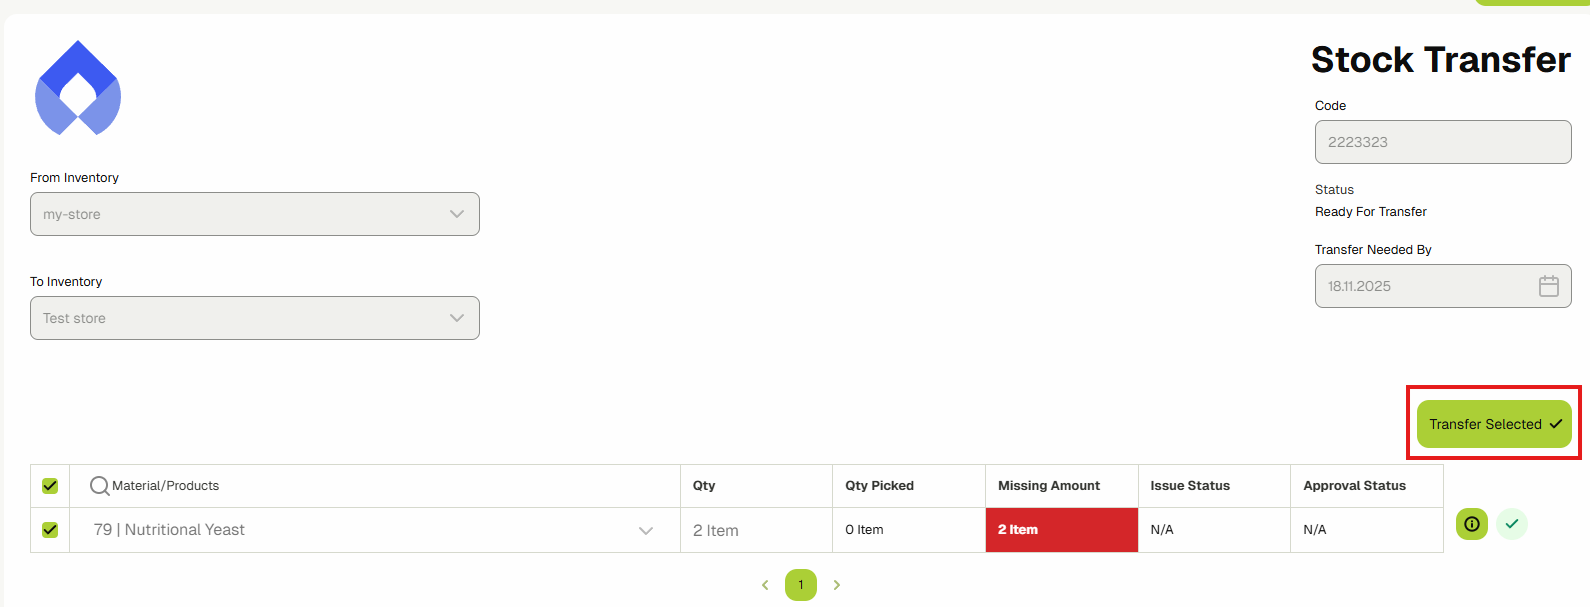
Once the required materials for stock transfer are reserved, go back to the Stock transfer and click on the green tick button to mark the material as Transferred and ready for approval by the destination.

Or alternatively, you can select multiple rows to mark them as Transferred, by clicking on the checkboxes on the left of the materials and then clicking on Transfer Selected button.
 info
infoNote that this will not change the records of the materials/products stocks just yet, it will still be in the "From Inventory" in a reserved state, until the receiving inventory approves them.
-
After the materials are marked as transferred, you should be able to view the approval buttons as you will have access to the "To Inventory" as shown in the following picture, then you can click on the approve or reject the materials.
 info
infoFor the Approve and Reject buttons to appear, you must have access to the To Inventory of this stock transfer.
-
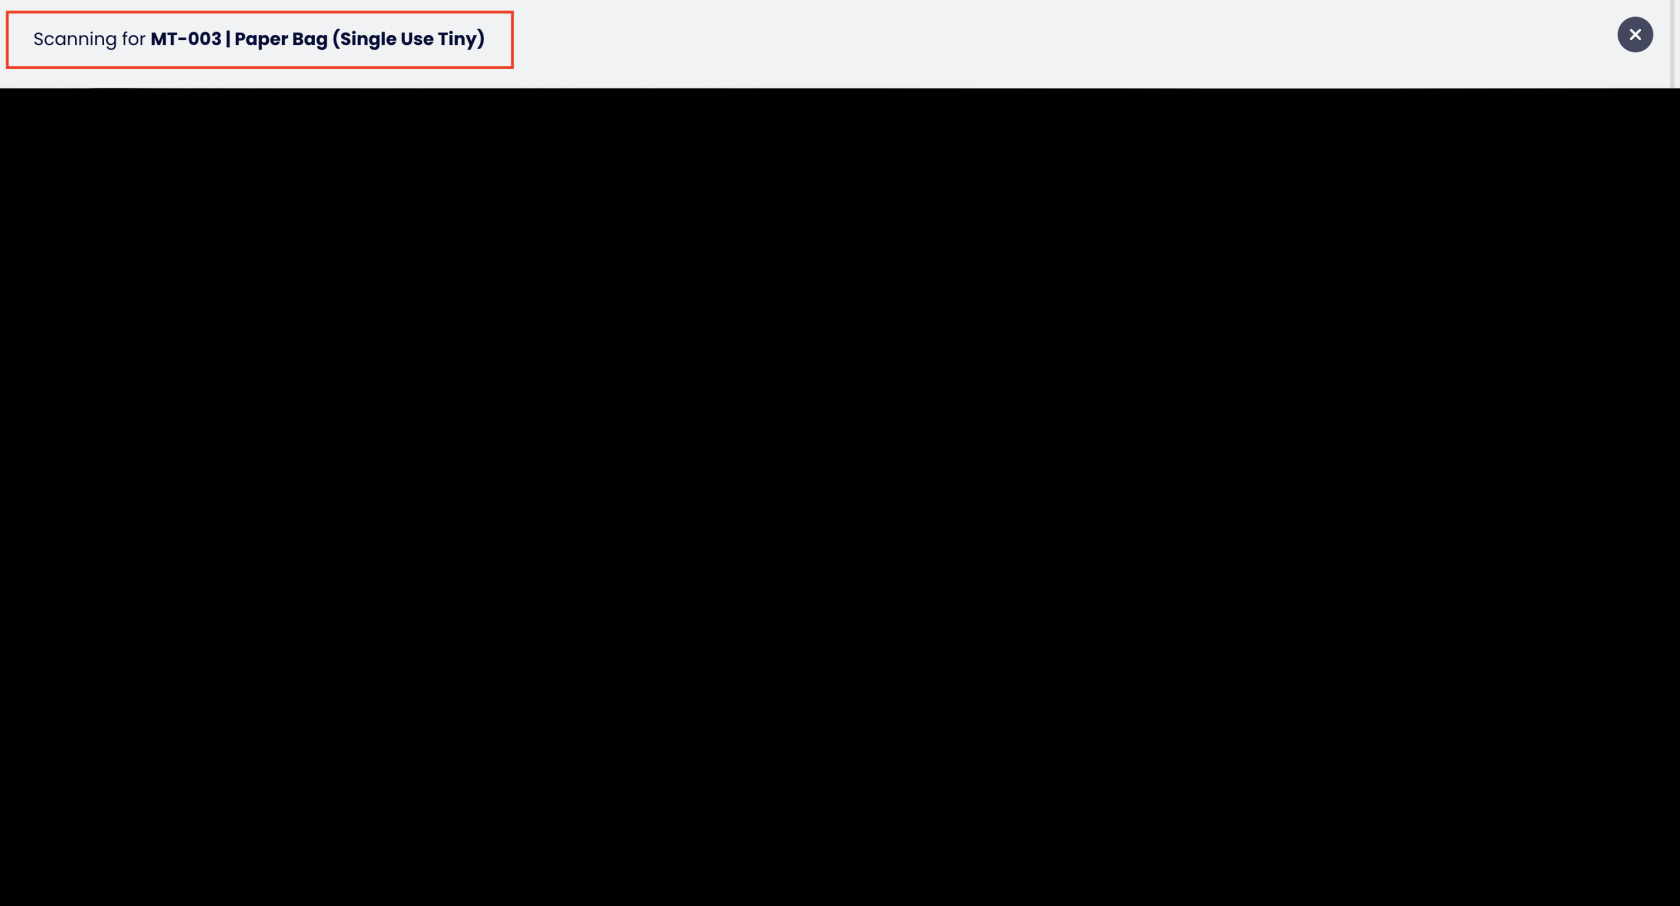
After Approving the materials, you will click on Confirm, and it will open the camera for you to scan the QR of the materials that arrived at your location.
The screen will show you which QR is it trying to scan for on the top. It will ask you to scan for all of the materials/products that you have selected to approve.
-
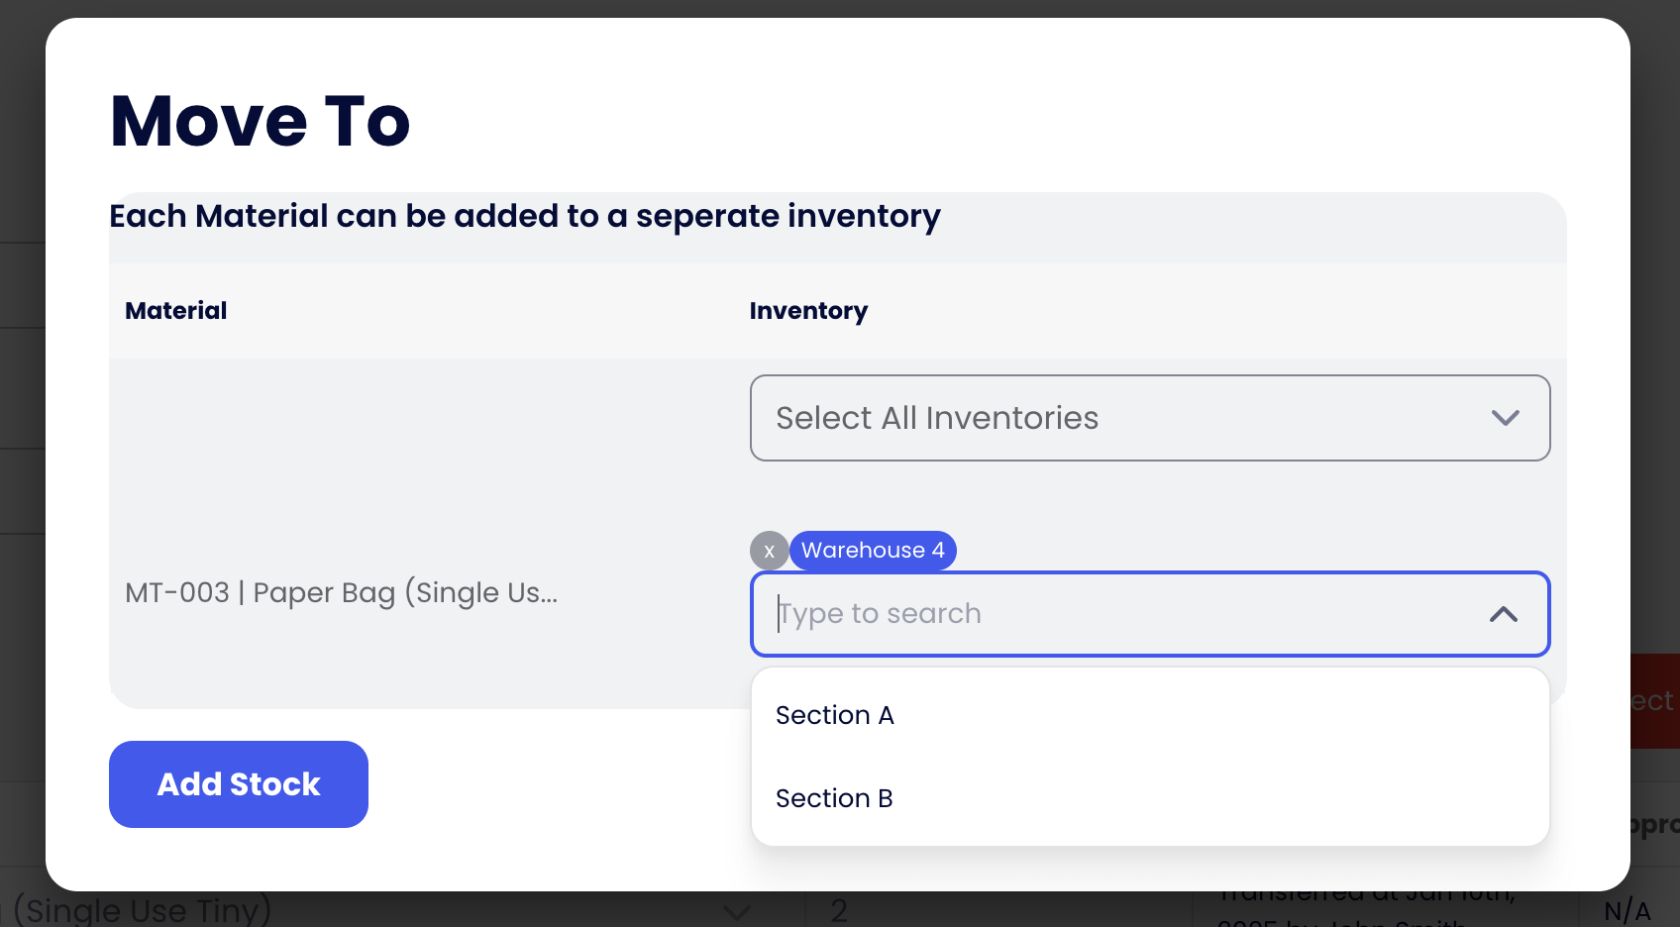
Once you scan all of the materials/products, it will prompt you to choose a specific sub-inventories for each material/product to transfer to, once you are done, click on the "Add stock" button.
-
Your "To" inventory will now have the transferred materials. You can verify it by opening up the "To" inventory detail view and checking the Store stock levels.

Conclusion: After following this article, You’ll be able to perform stock transfers between inventories easily.
Internal Transfer
In this guide, you will learn how to use Internal Transfer, which will allow you to quickly organize and transfer stocks between sub-inventories within the same Inventory, assuming that you have an Inventory with sub-inventories.
Example: you want to move stocks from Main Warehouse, Section A, Shelf B to Main Warehouse, Section B, Shelf D.
Note: If you want to move stocks from one warehouse to another, use Stock Transfer instead.
- Navigate to the Stock Transfers by expanding the Inventories sidebar link and clicking on the Internal Transfers link.
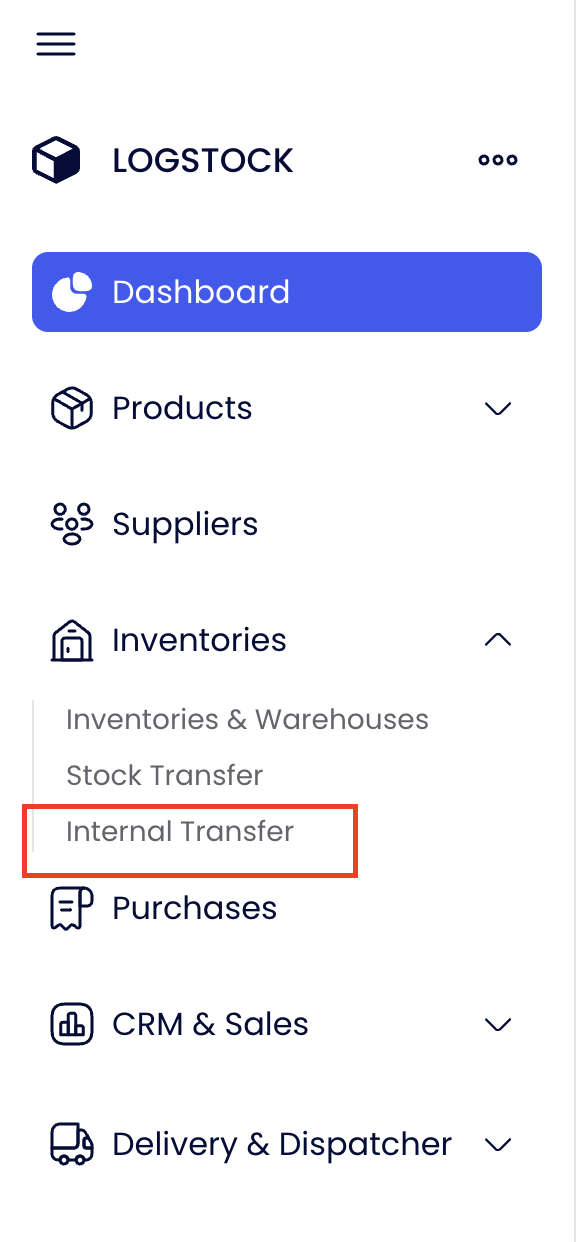
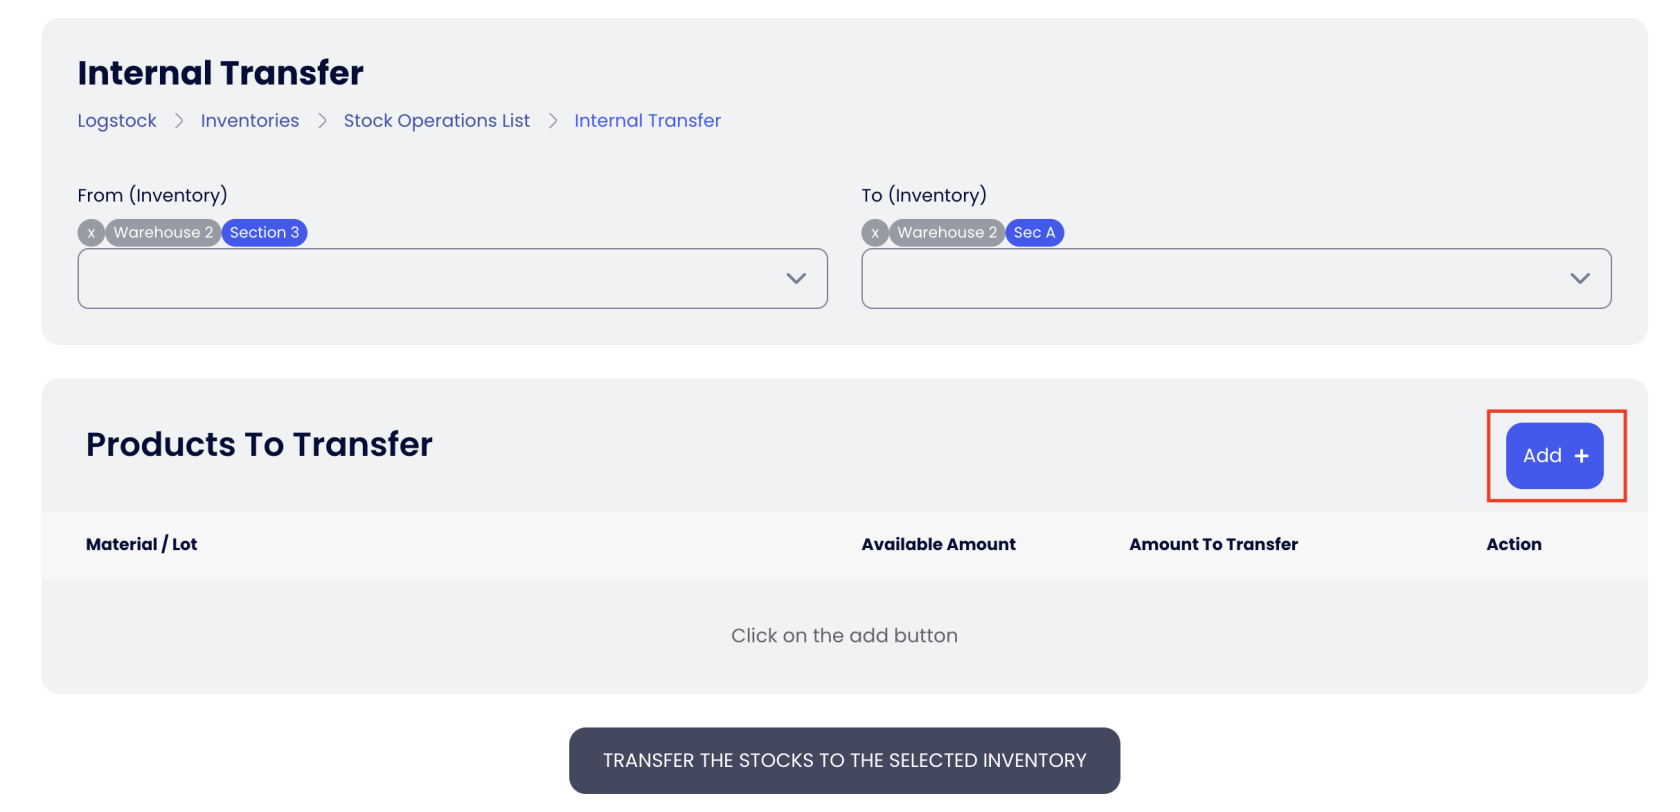
- Then you will find the form for the Internal Transfer.

- Next, in the From (Inventory) field, select the warehouse you want to perform the internal transfer on.
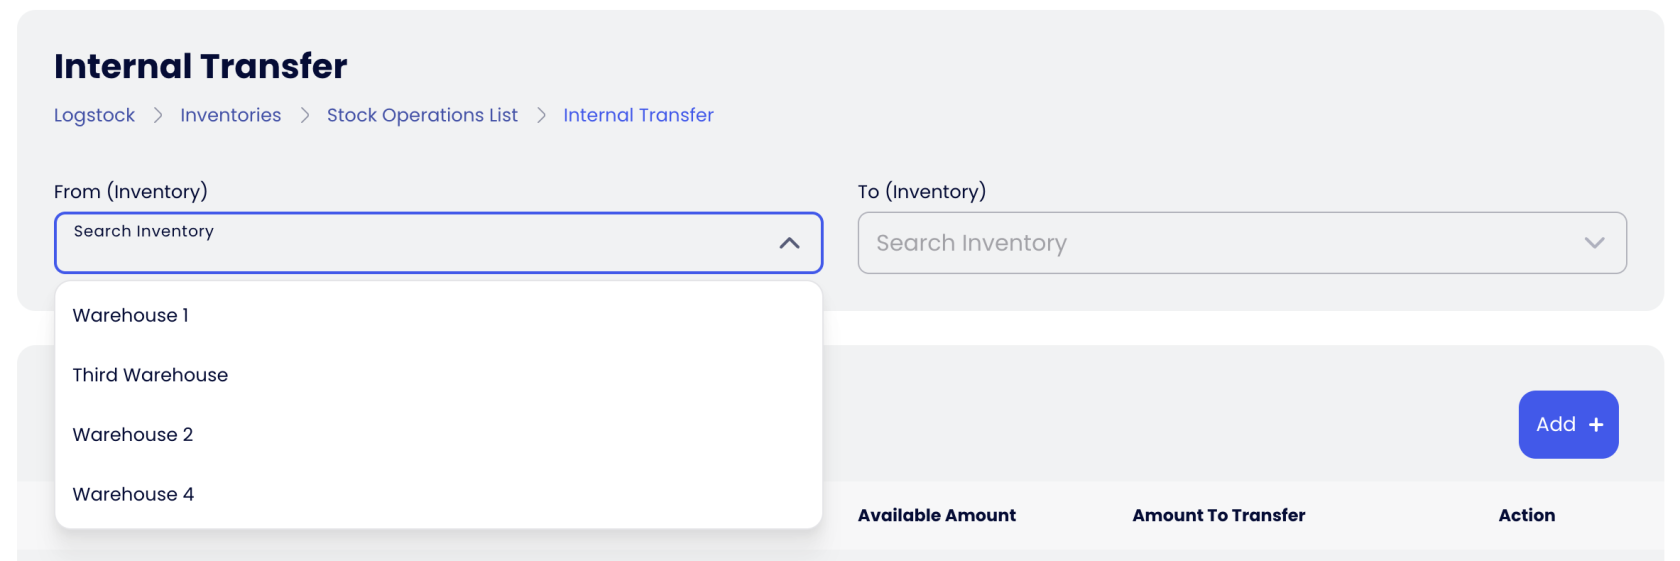
- You should see that now it will show you the sub-inventories. You can select the sub-inventory and keep selecting the path to the desired sub-inventory.
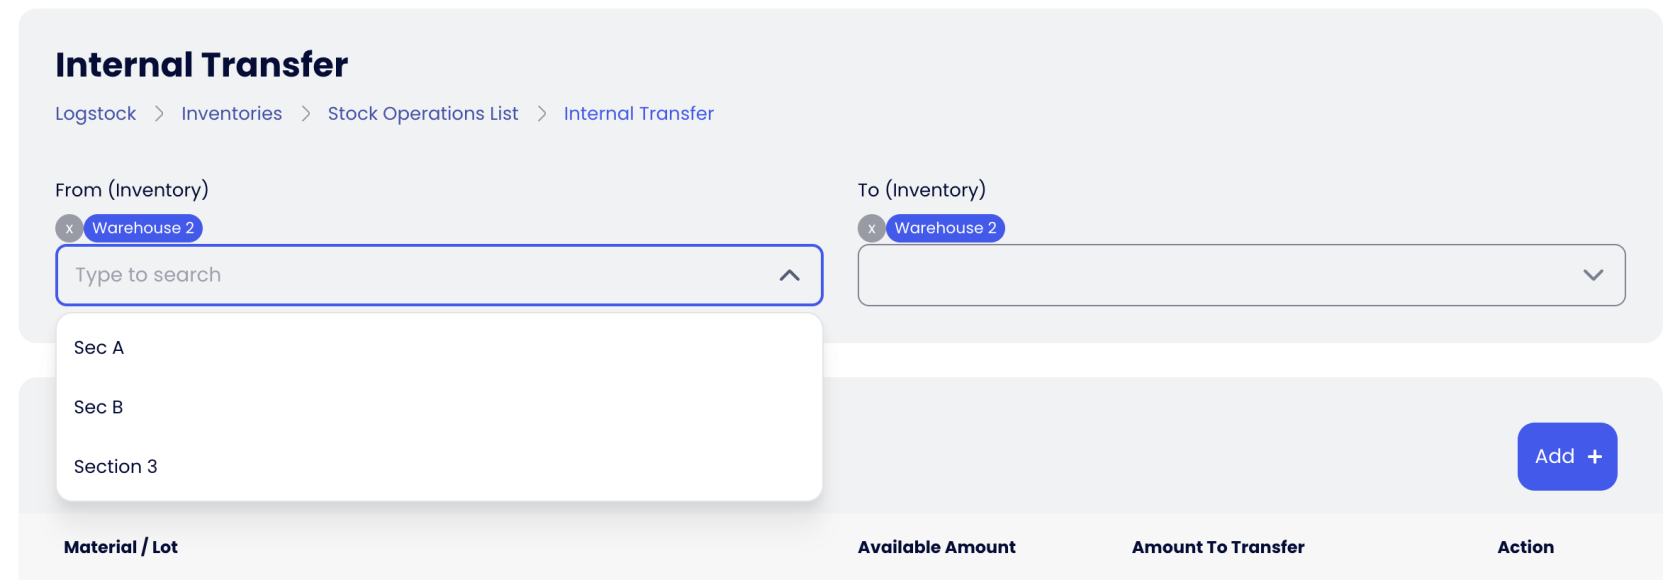
- After that, you will do the same for the destination inventory.
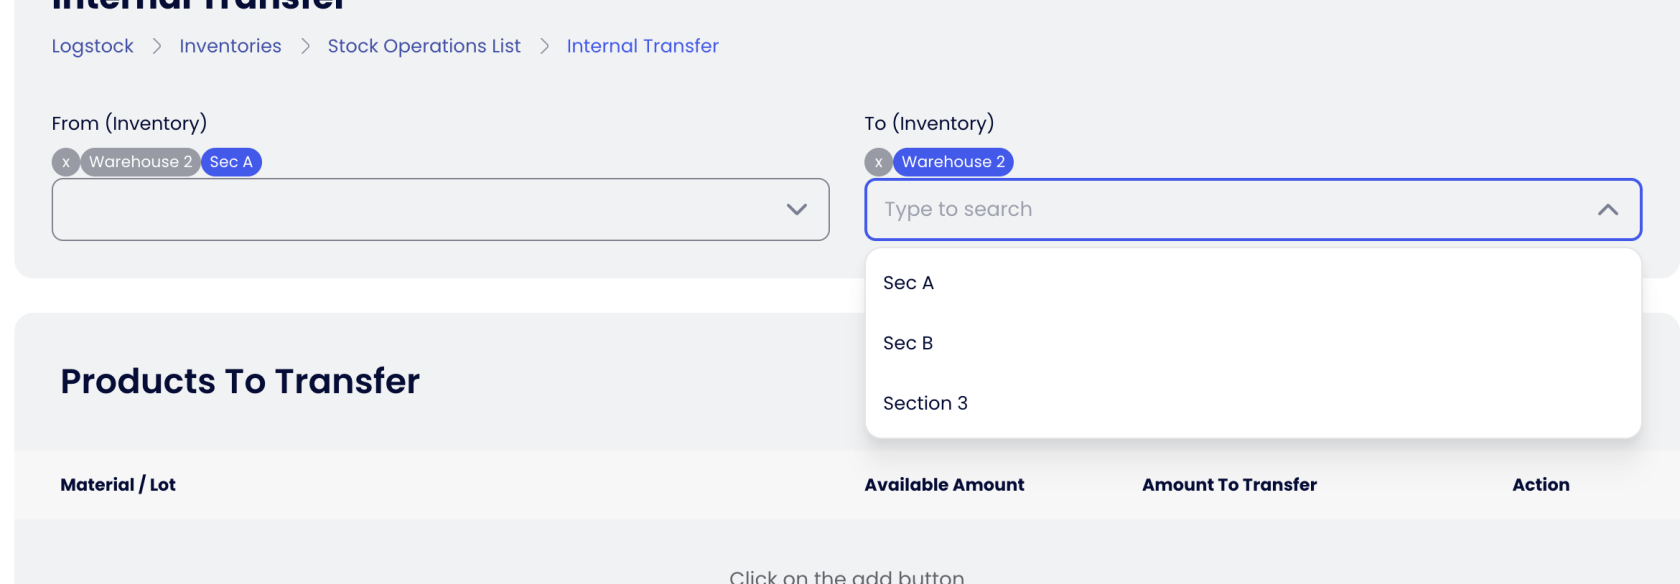
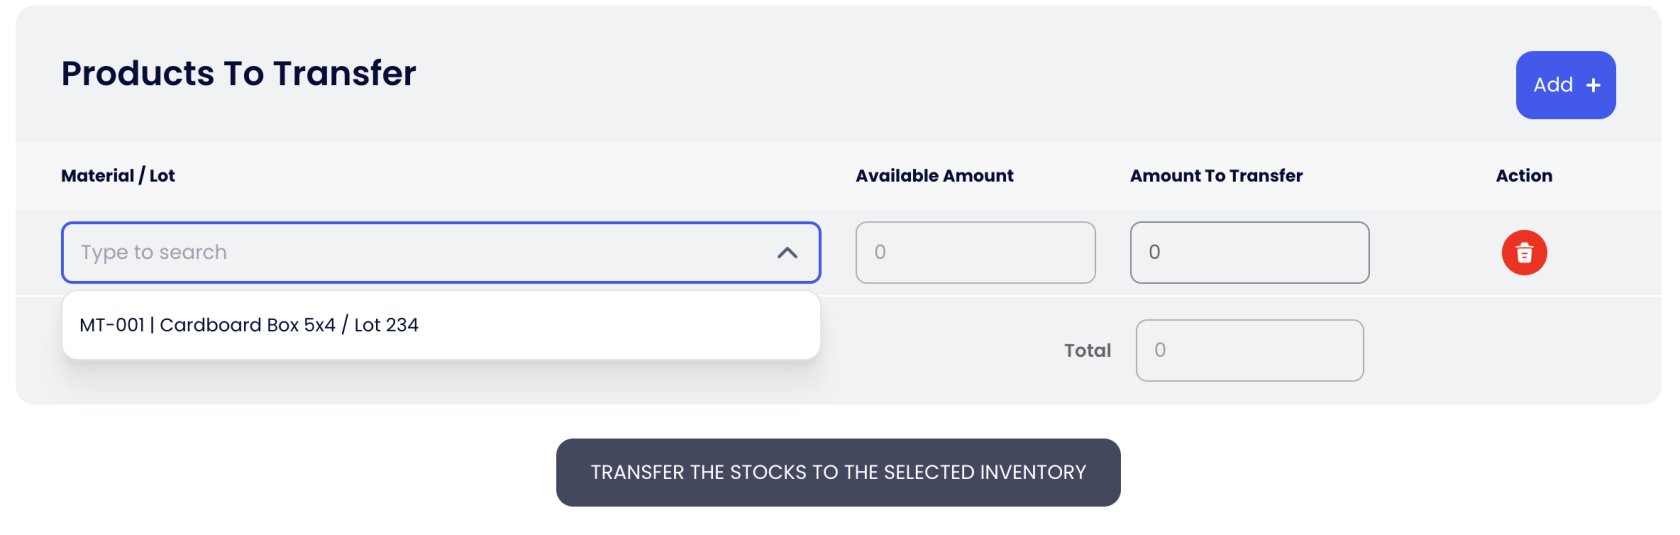
- Once you are done with selecting the inventories, click on the Add + button below in order to add a row for the products to be transferred.
- Search and select the product by its code, name, or Lot label, then input the amount you want to transfer.
- Once everything is set, click on Transfer the stocks to the selected inventory, wait for the success message and then you are done.
Stock Take
A Stock Take is a type of stock operation document that allows you to verify, correct, and add stock within your inventories.
It is especially useful for warehouse staff who need to ensure that the data in the system matches the actual stock available in the warehouse.
Schedule a Stock Take
- Navigate to Inventories & Warehouses by clicking on the Inventories link in the sidebar.
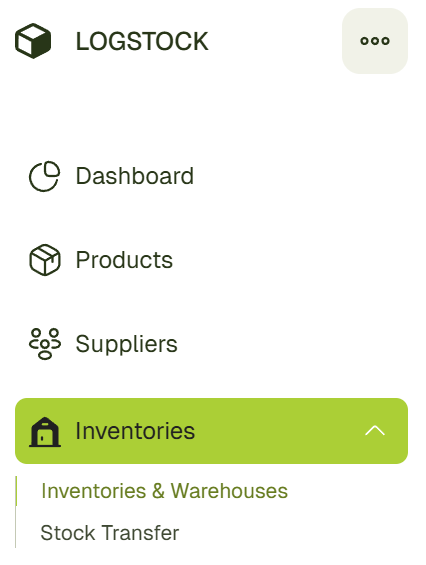
- Click the Stock Operations button and select the Stock Take option.
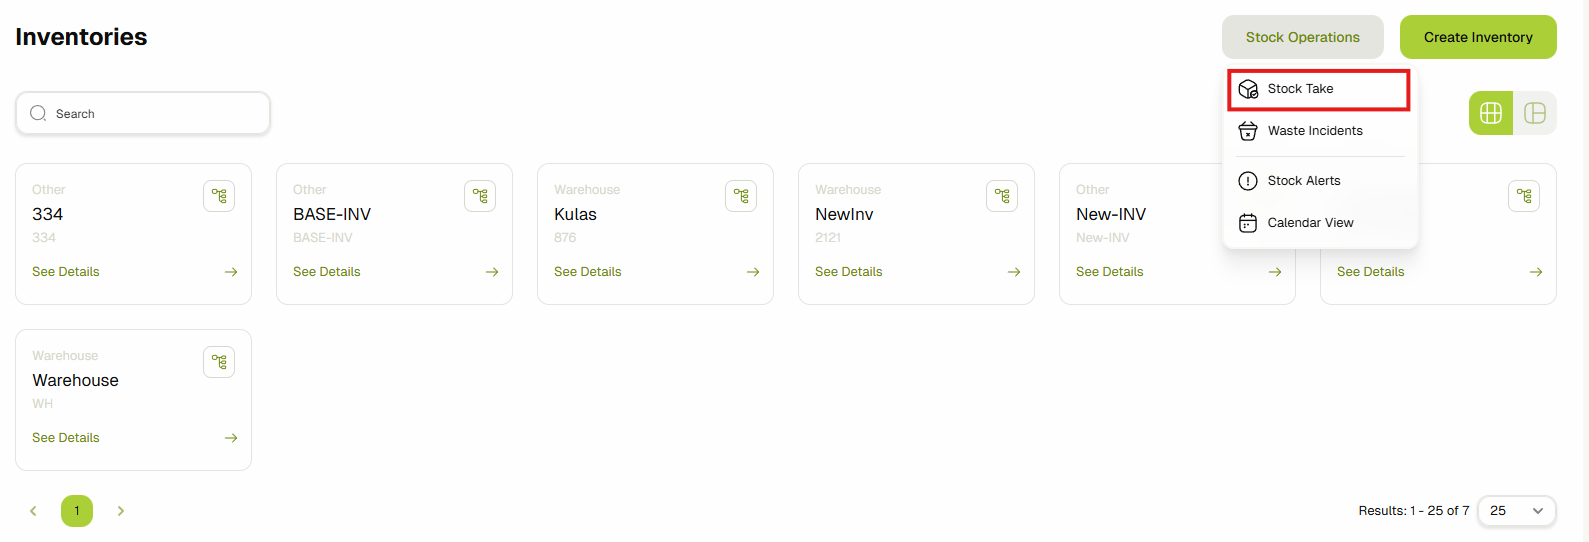
- A list of all scheduled, in progress, cancelled, and completed stock takes will be displayed.
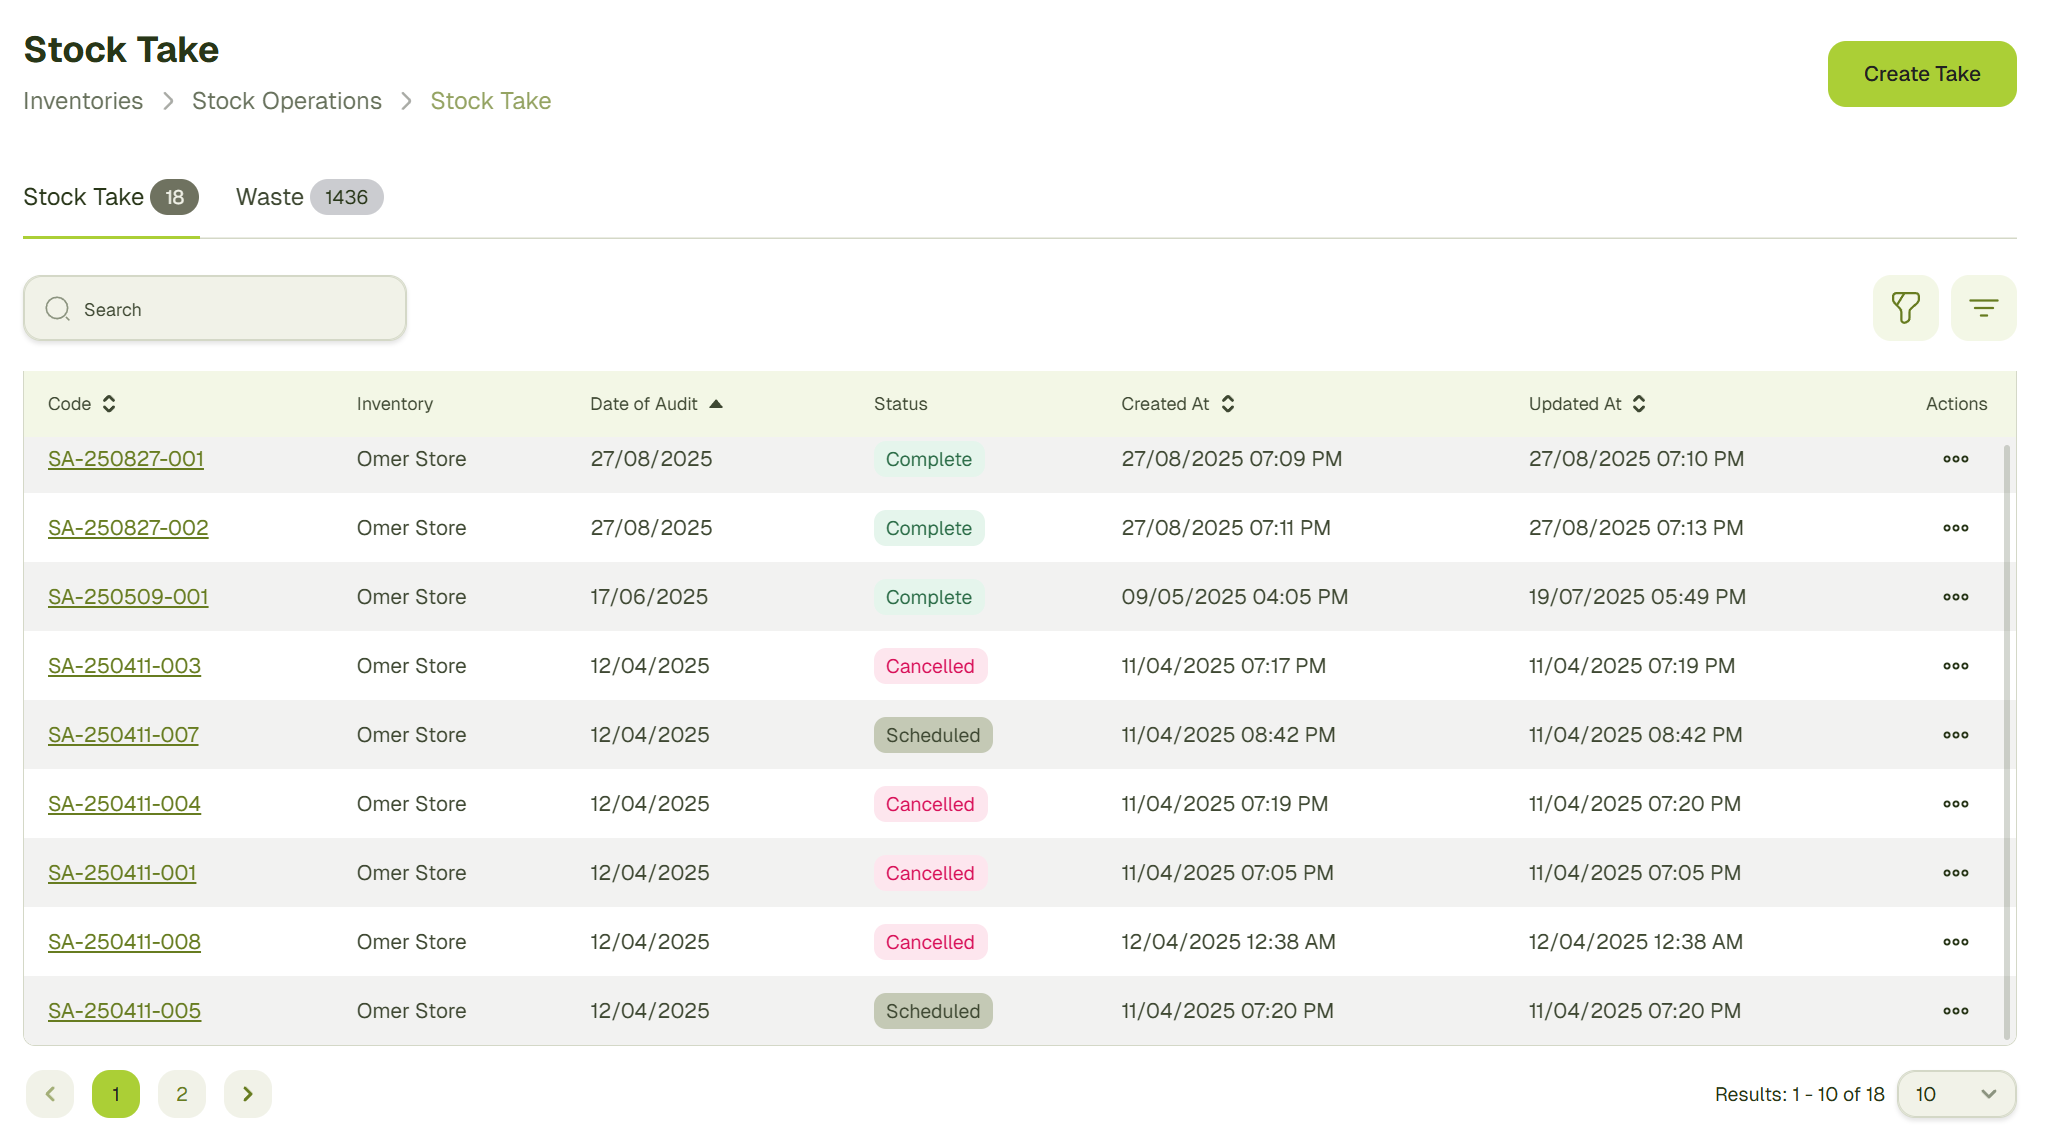
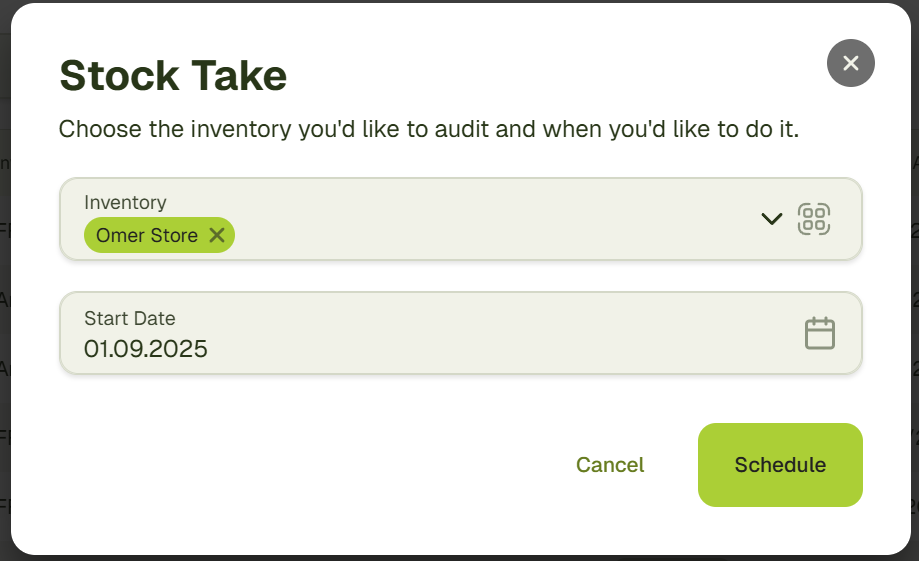
- Click the Create Take button to open the stock take creation dialog.
Select the inventory where you want to perform the stock take, choose the start date, and click Schedule.
Start Stock Take
-
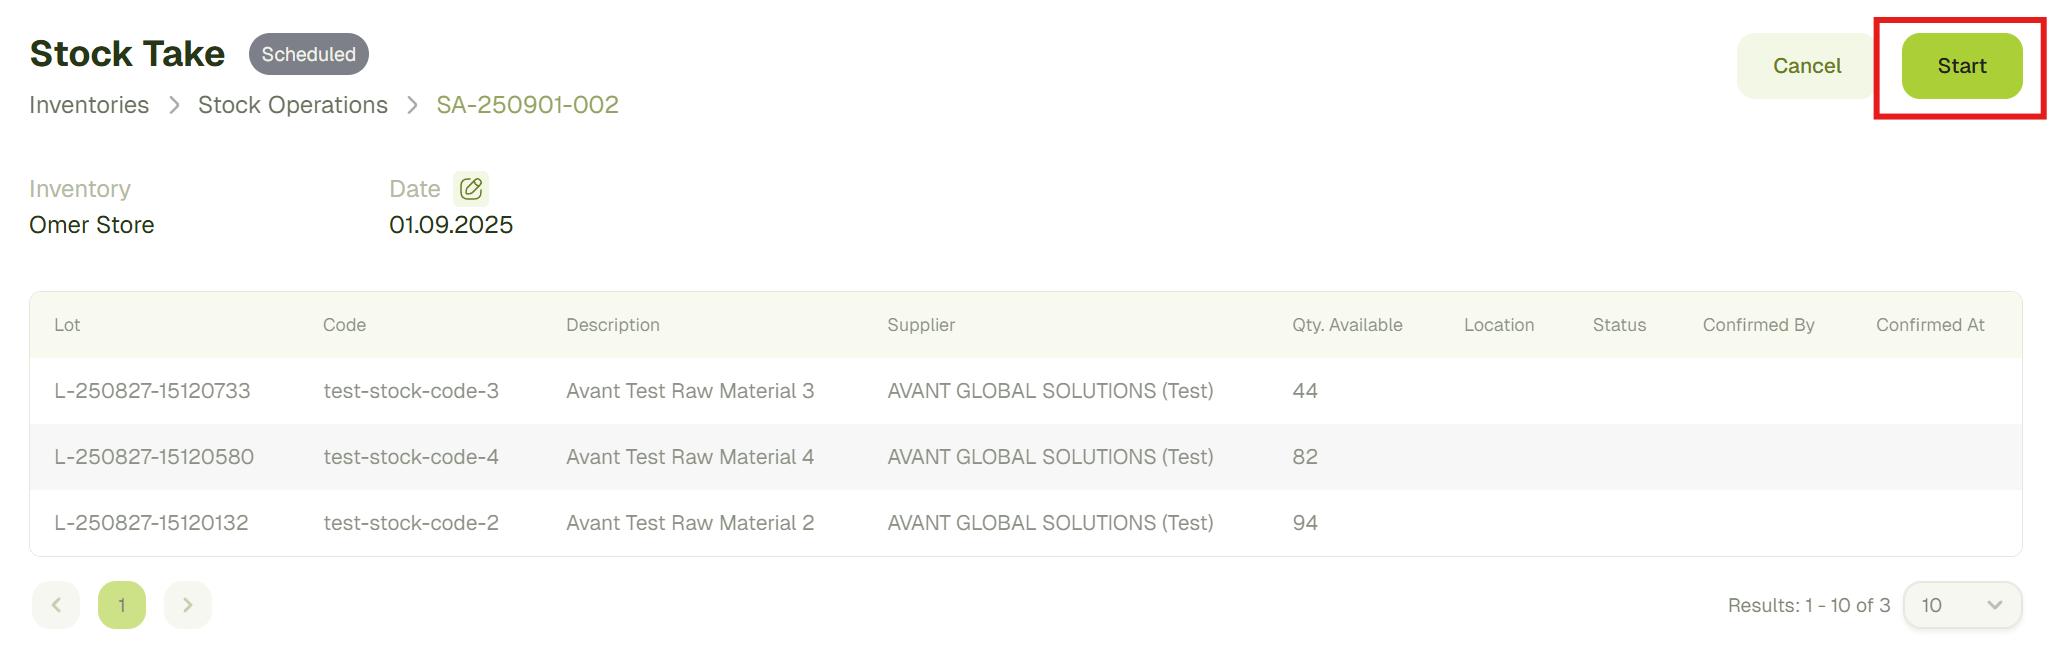
Once the scheduled date arrives, open the stock take document and click Start.
-
The status will change to In Progress, and you can begin performing the stock take.

-
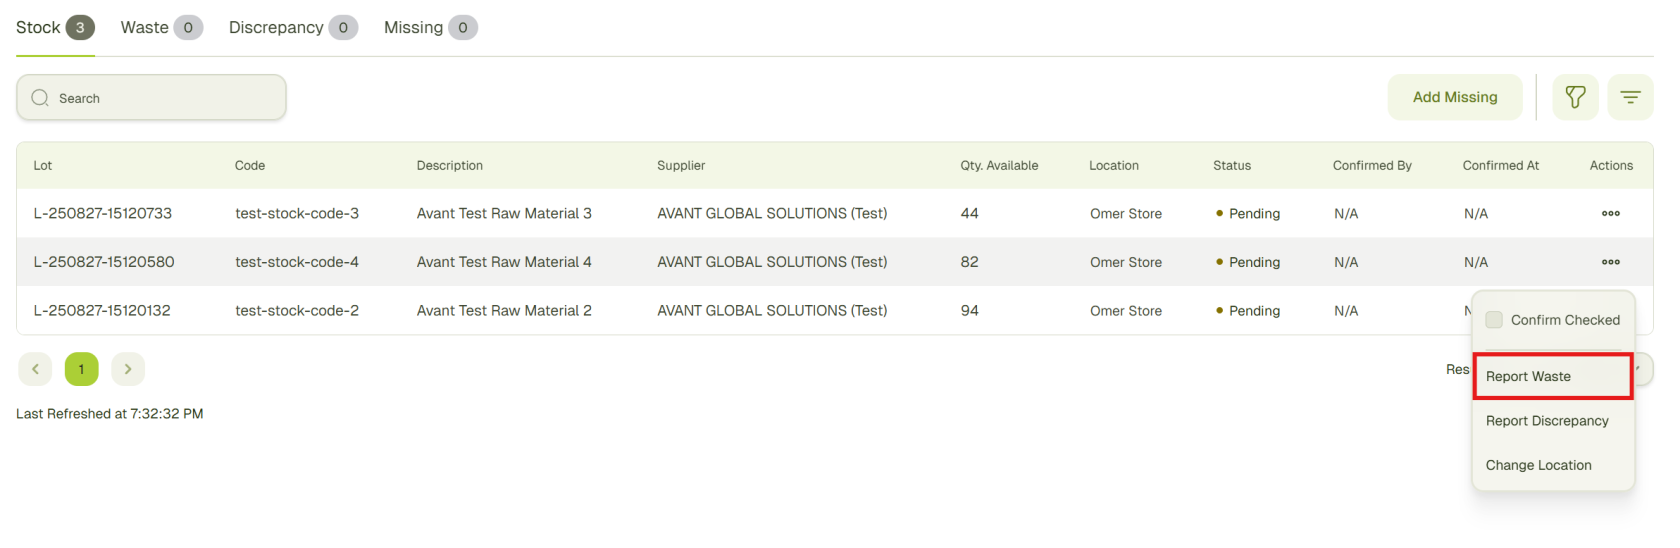
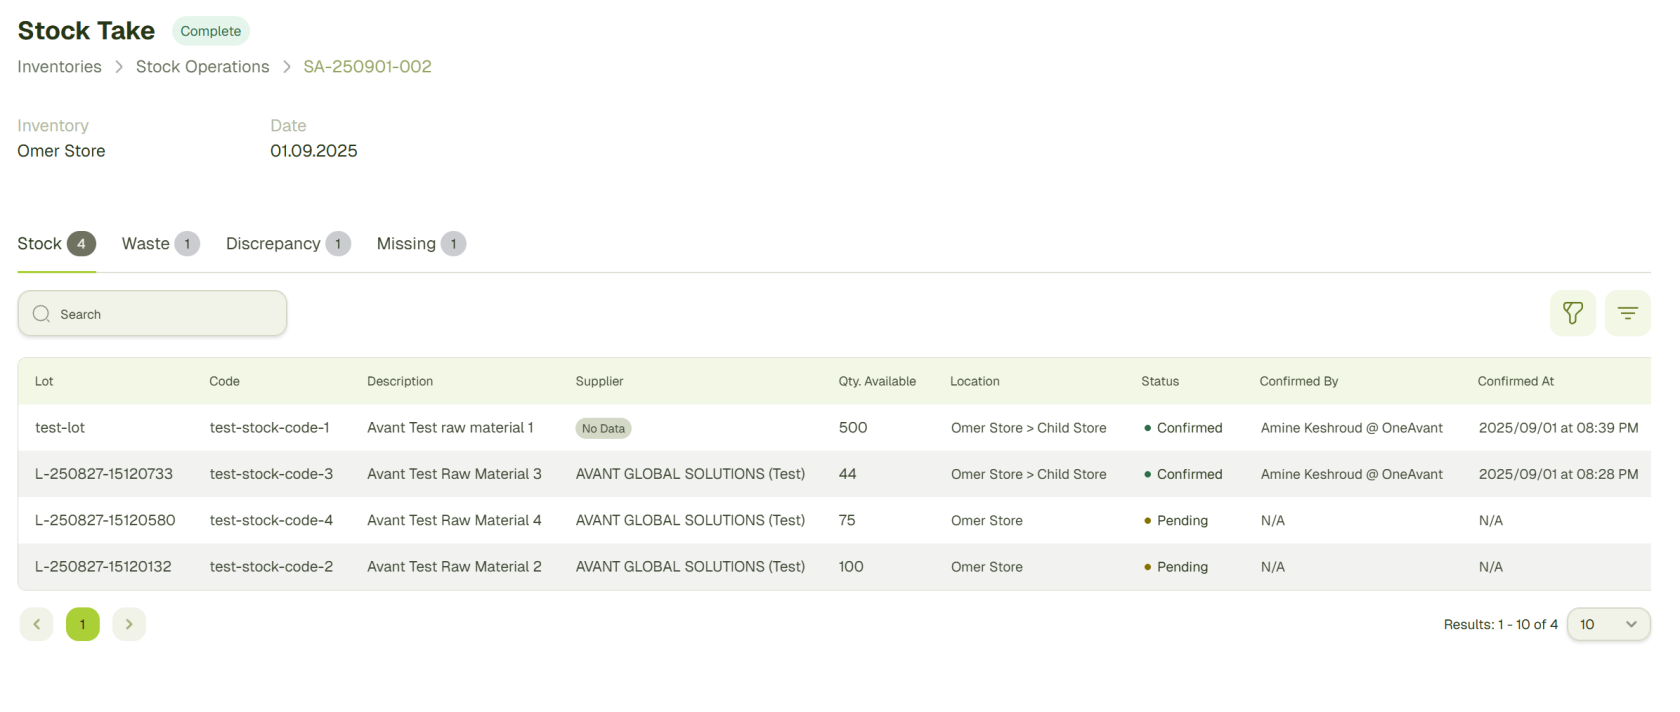
The stock take document contains four tabs.
 info
infoStock - Displays the stock currently available in the selected inventory. Waste - Used to record any stock wasted during the stock take. Discrepancy - Used to record quantity differences between system data and actual stock. Missing - Shows the new stock that was added in this stock take.
Report Stock waste
- In the Stock tab, click the menu button next to the stock you want to report as waste and select Report Waste.
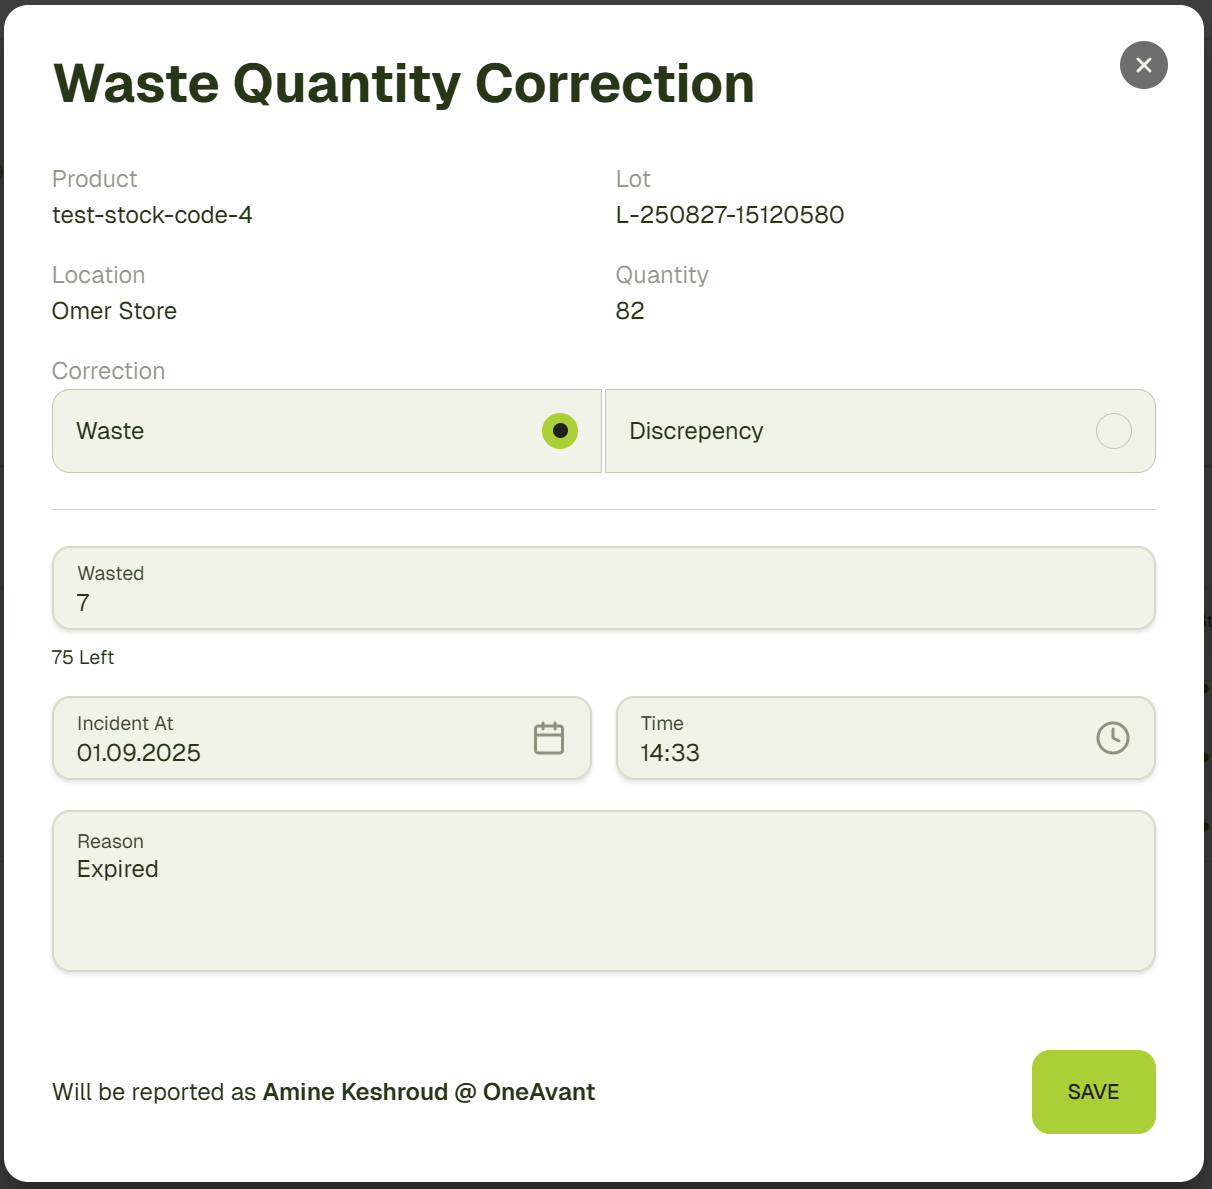
- A Waste Quantity Correction dialog will open.
- Enter the quantity to be wasted (the system will also show the remaining stock)
- Select the incident date and time.
- Provide a reason for the waste.
- Click Save.
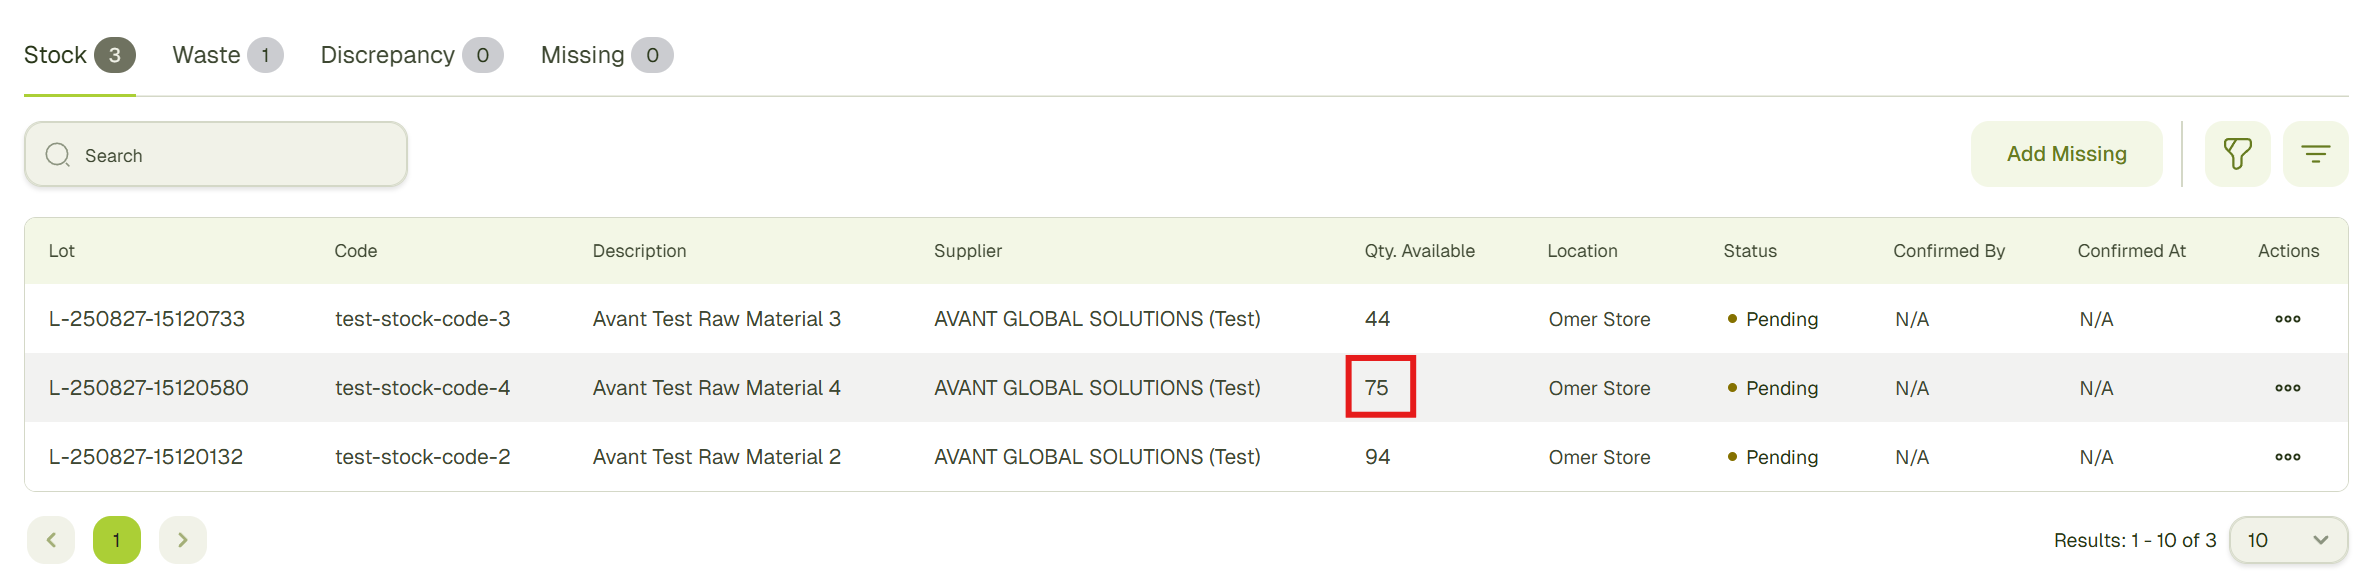
- The stock amount in the Stock tab will be updated to reflect the new quantity.
- To review the waste records, open the Waste tab. This table displays all waste operations, including:
- Old Quantity
- New Quantity
- Reason for Waste

Report Stock discrepancy
-
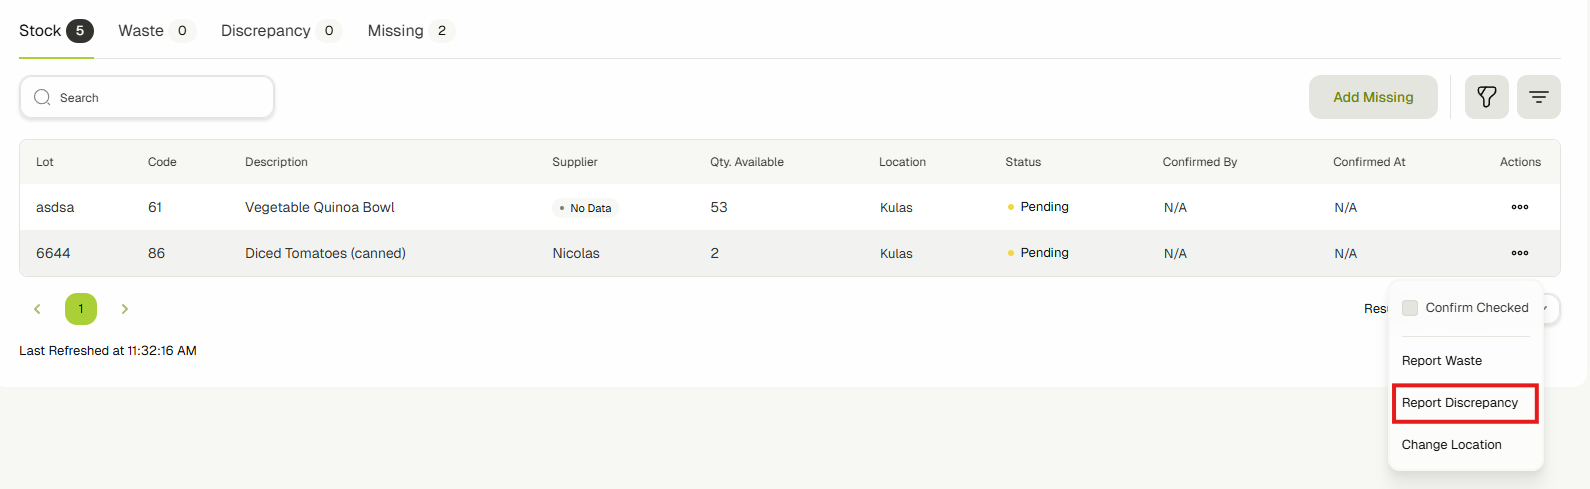
In the Stock tab, click the menu button next to the stock item you want to correct and select Report Discrepancy.
-
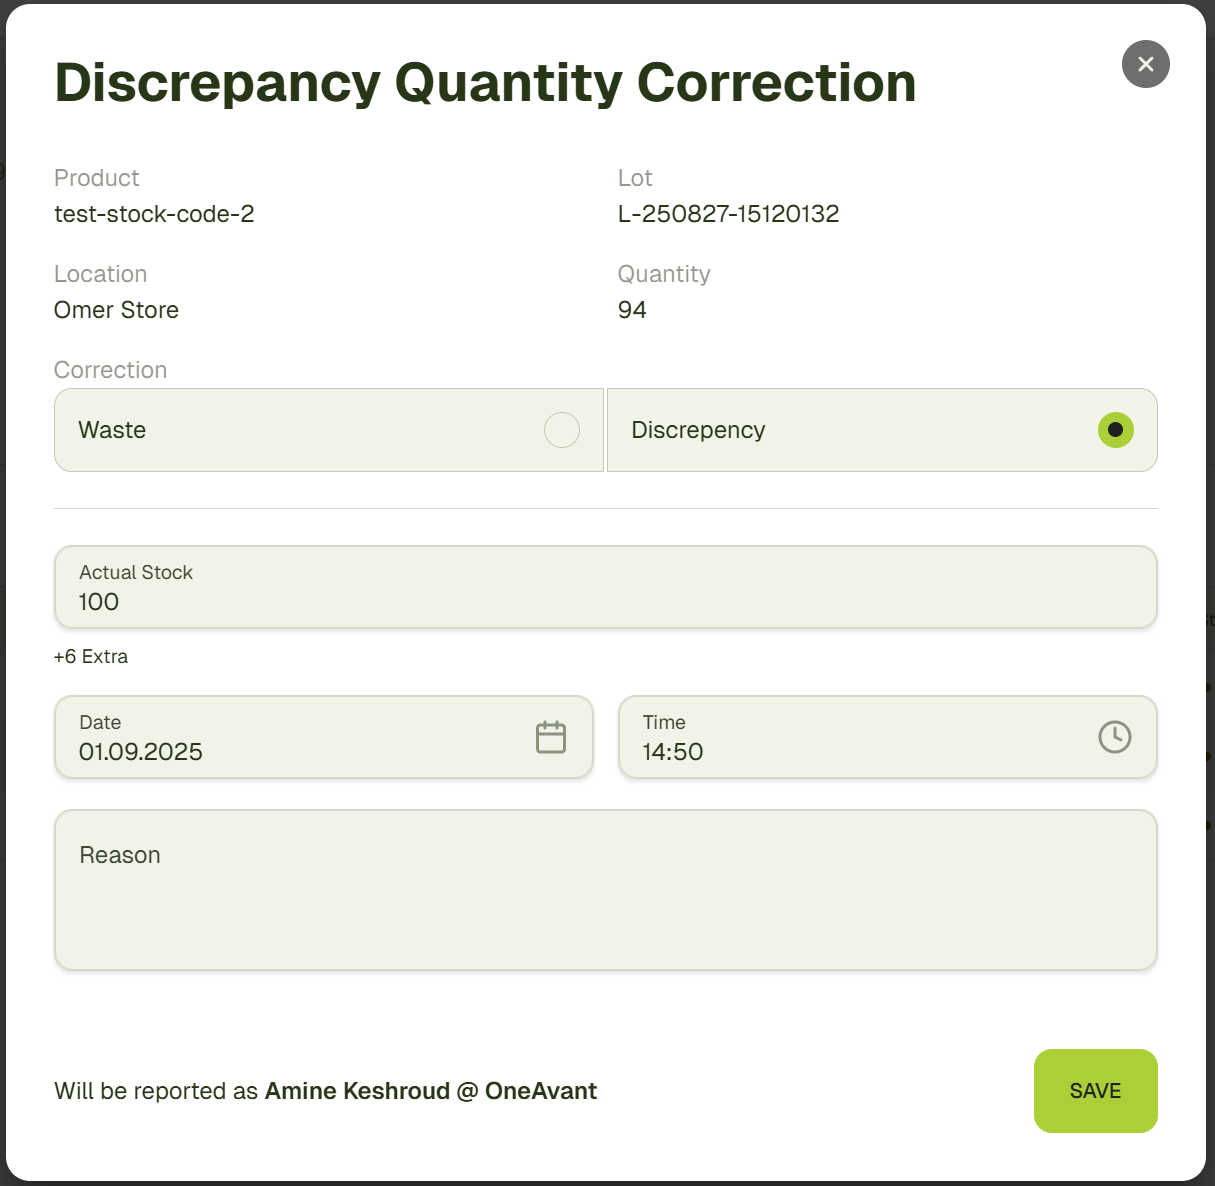
A Discrepancy Quantity Correction dialog will open.
- Enter the Actual Stock quantity you counted in the warehouse.
- Select the incident date and time.
- Provide a reason for the discrepancy.
- Click Save to confirm.
info
When you enter the actual quantity, the system will calculate and display whether the stock is Extra or Missing compared to the recorded amount.
-
The stock amount in the Stock tab will update to match the actual stock you entered.

-
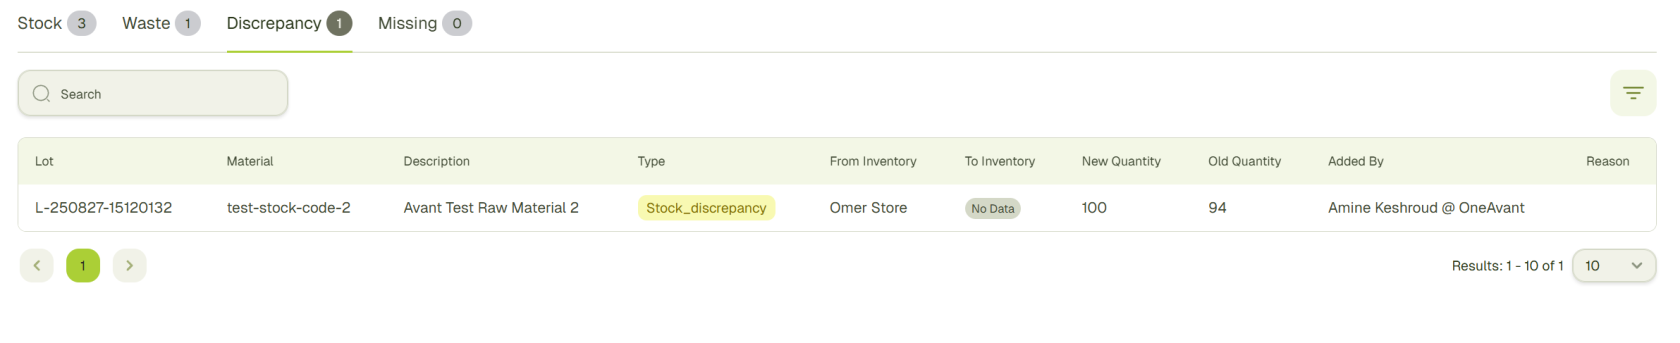
To review discrepancy records, open the Discrepancy tab. This table displays all discrepancy operations, including:
- Old Quantity
- New Quantity
- Reason for discrepancy
Change Stock Location
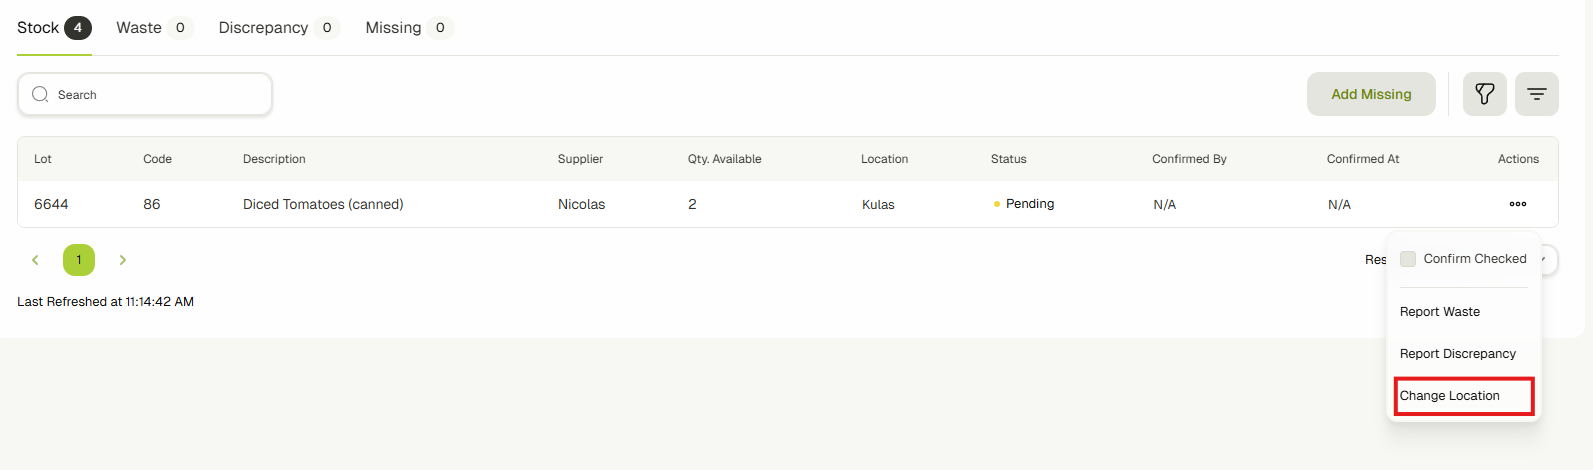
- In the Stock tab, click the menu button next to the stock item you want to move and select Change Location.
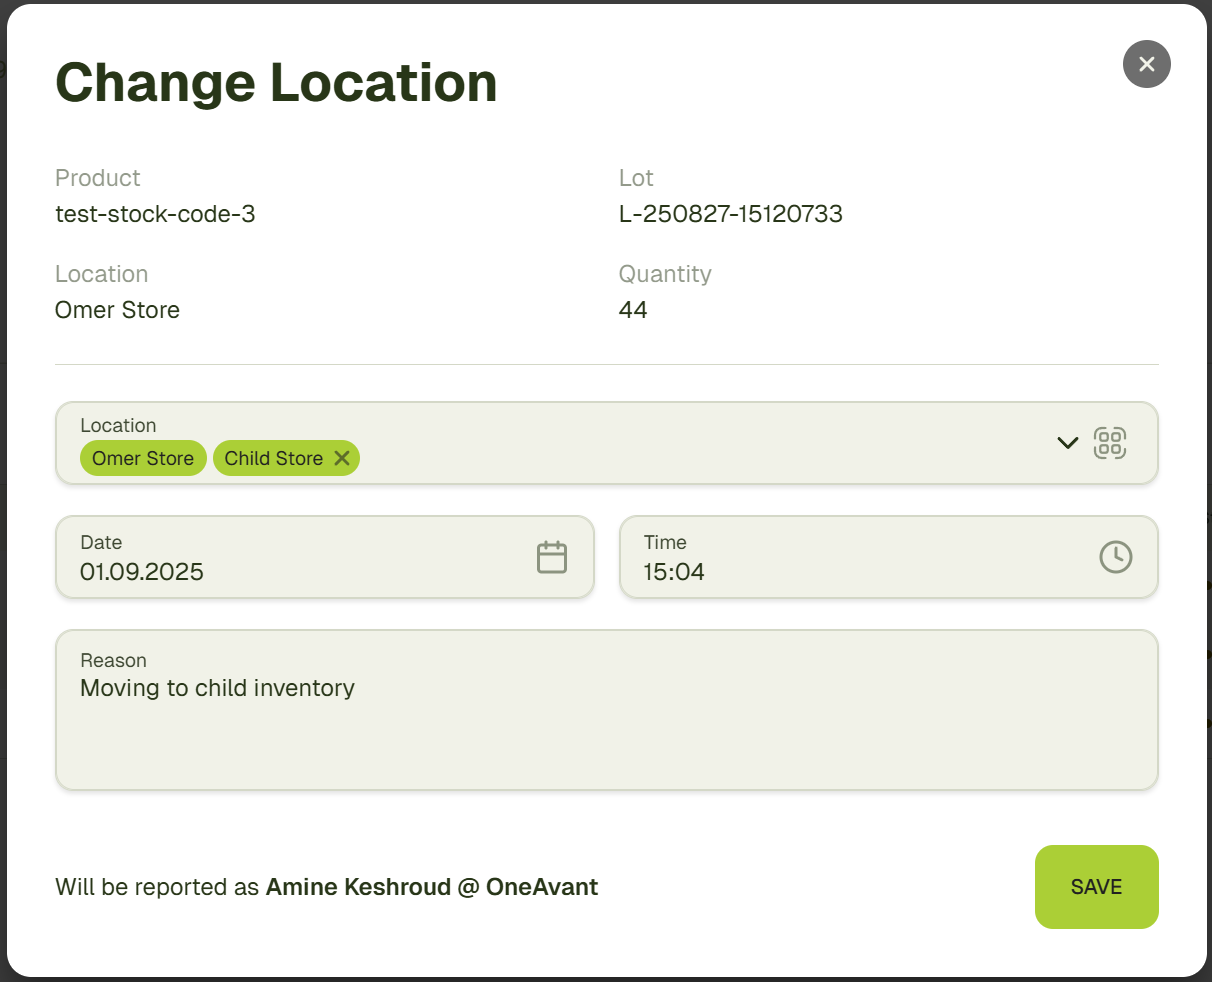
- A Change Location dialog will open.
- Select the new inventory (either a child or sibling inventory of the current one).
- Select the incident date and time.
- Provide a reason for moving the stock.
- Click Save to confirm.
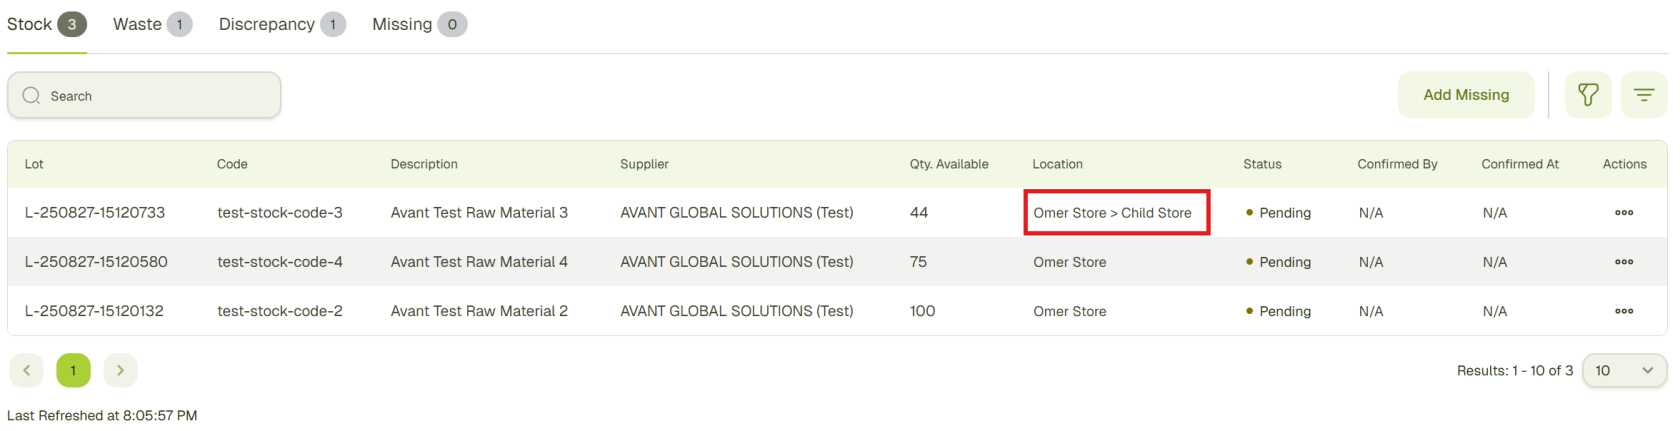
- The stock will be reassigned to the selected inventory.
Confirm Stock
- In the Stock tab, click the menu button next to the stock item you want to confirm and select the Confirm Checked option.
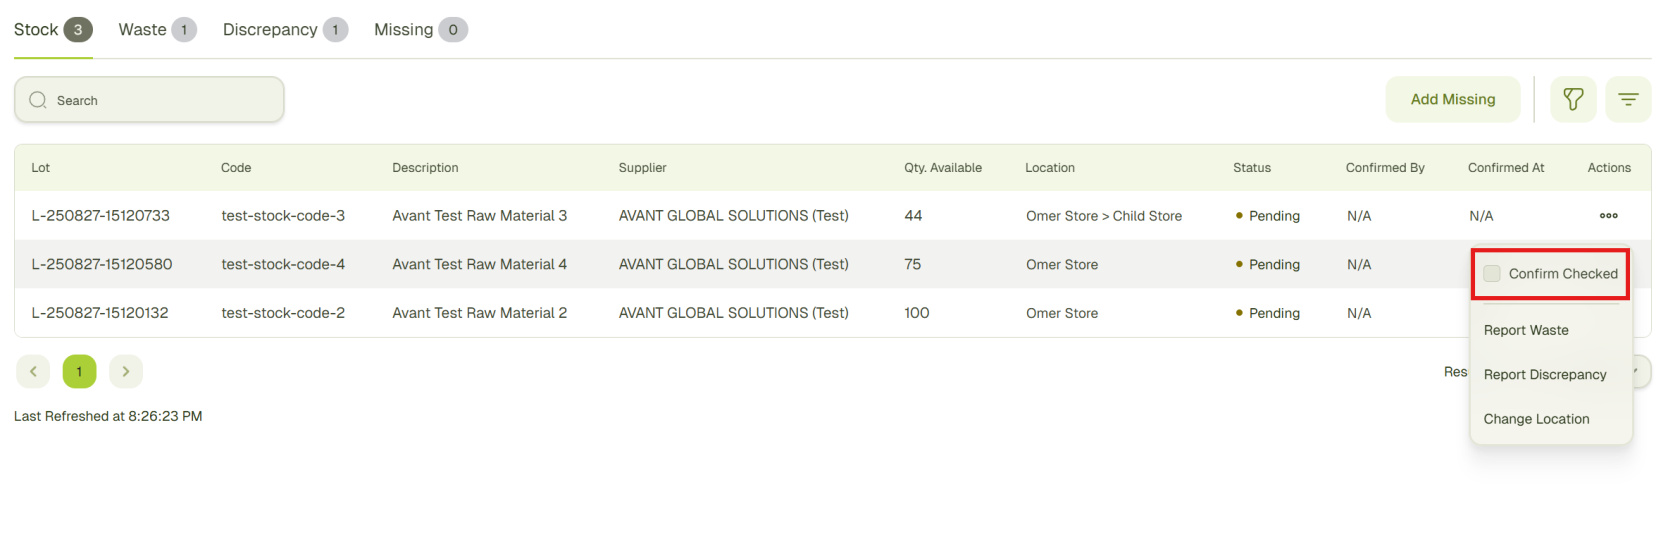
- The stock status will update from Pending to Confirmed and the system will also record who confirmed the stock and the date and time of confirmation.

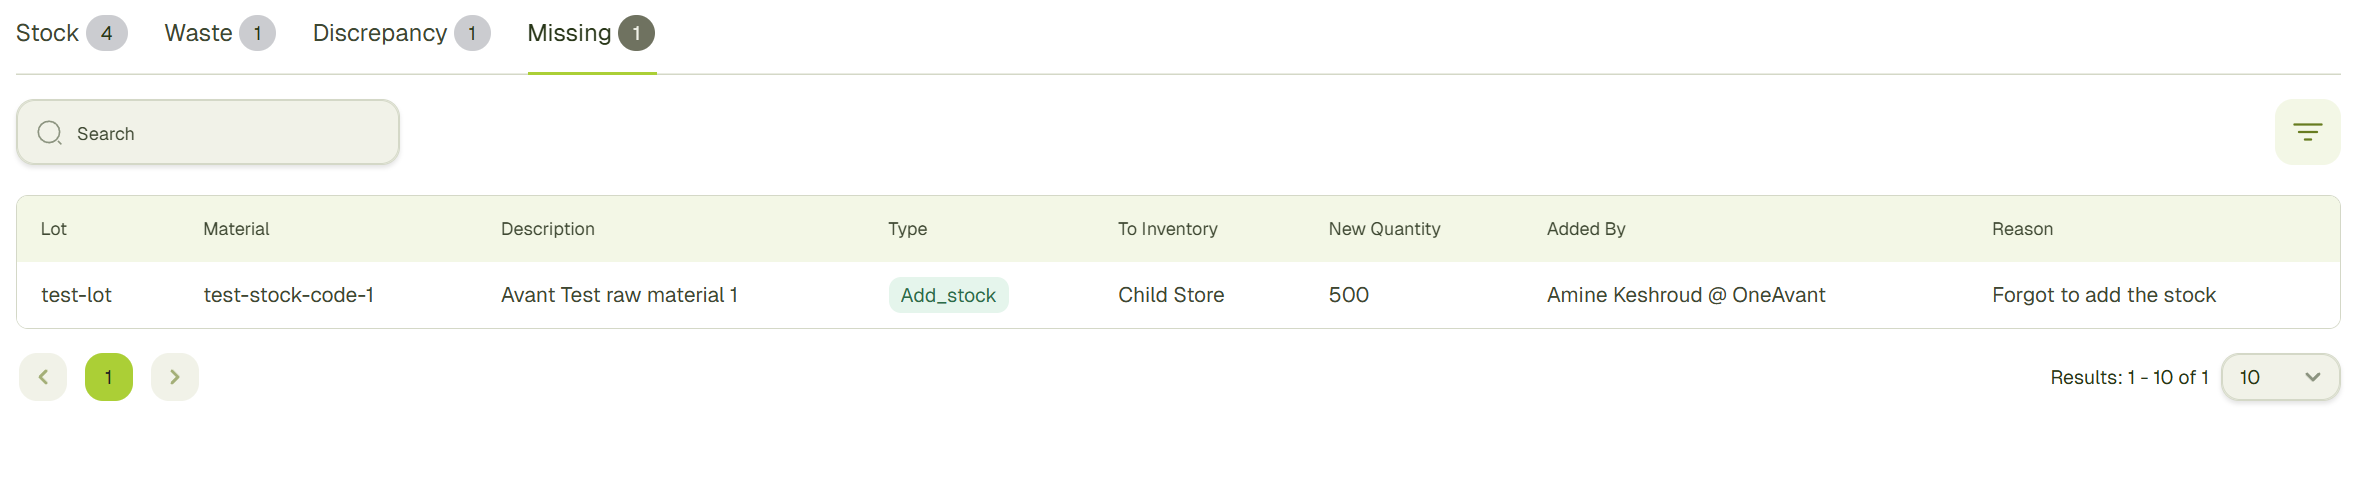
Add Missing Stock
If you have some missing stock that you want to add, you can do that as well.
- In the Stock tab, click the Add Missing button.
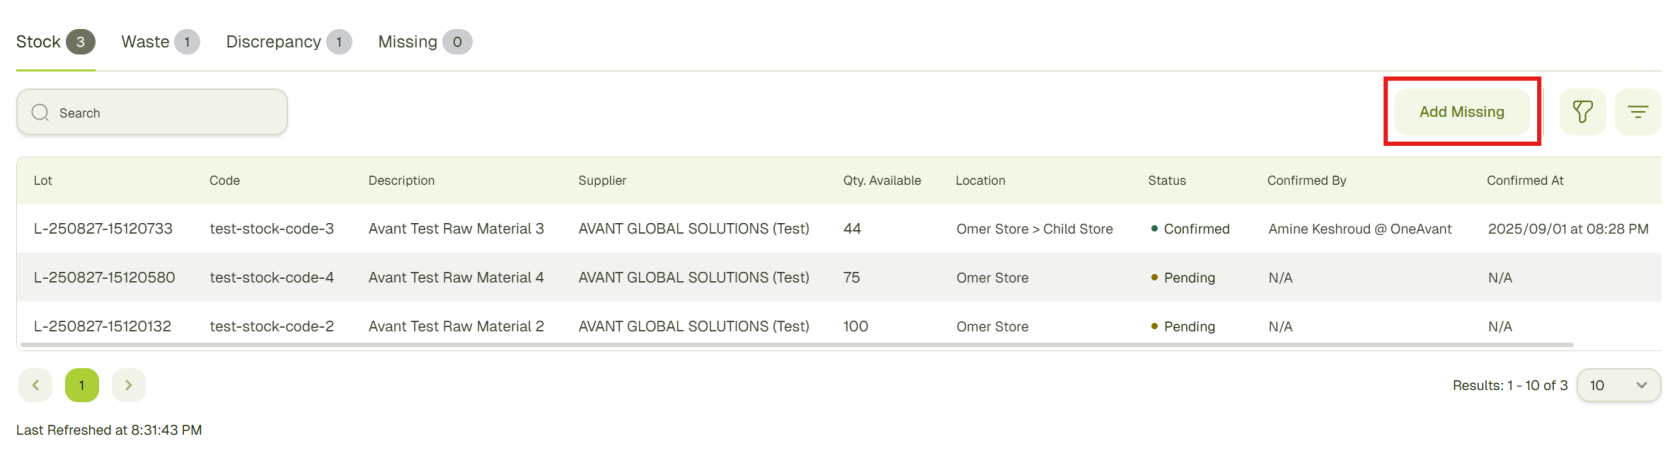
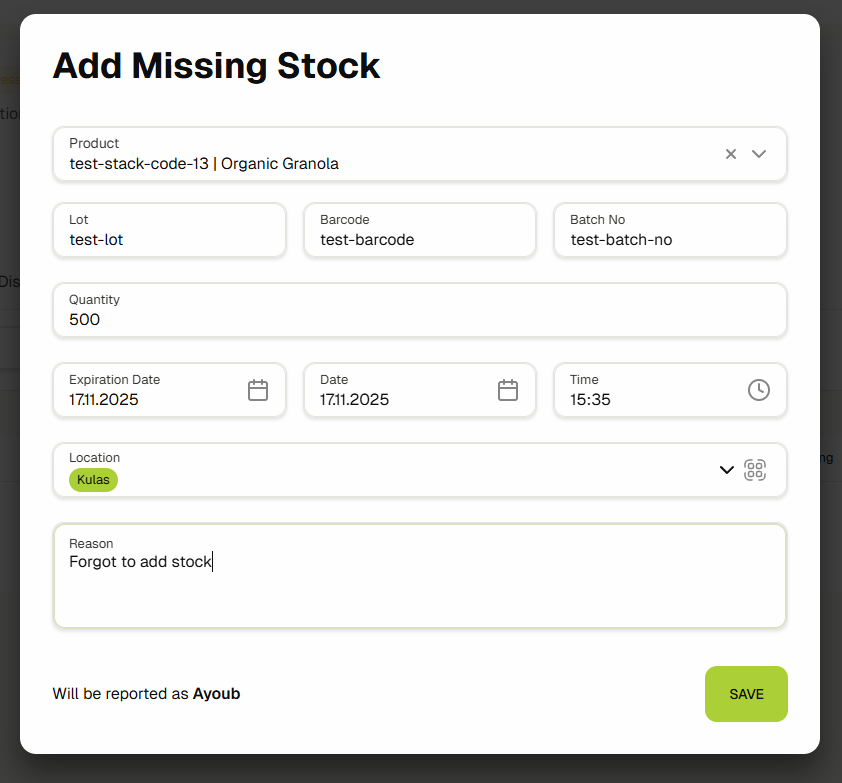
- An Add Missing Stock dialog will open.
- Select a Product
- Enter Lot, Barcode and Batch No
- Enter Quantity
- Set an Expiration date
- Select the incident date and time.
- Choose the location (inventory)
- Add Reason for adding the stock
- Click Save to add the stock
- The new stock will appear in the Stock tab.
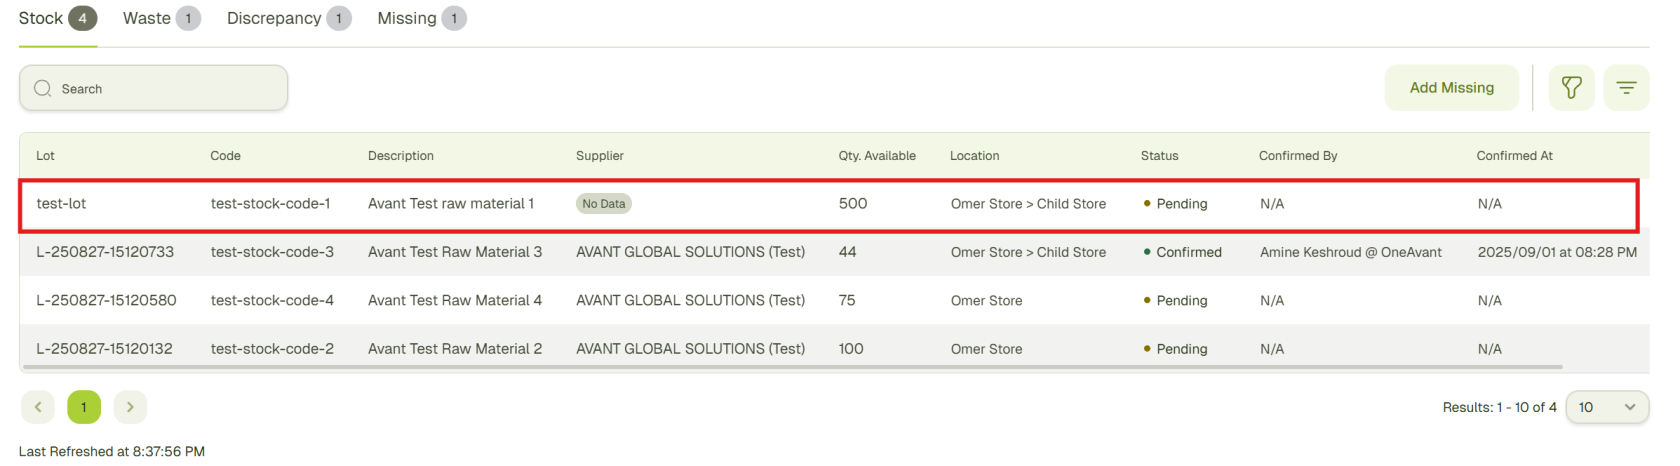
- A record of this action will also appear in the Missing tab, showing the details of the added stock.
Complete Stock take
- Once you have finished your stock take, click the Complete button.
- The stock take status will update to Complete, and no further changes can be made.
- All records (waste, discrepancies and missing stock) remain available for review in their respective tabs.
Inventory Scanner
In this guide, you'll learn how to generate labels for Inventories and how you can use them to automatically select the inventories in multiple places like picklists, add stock to inventory modals, etc.
Generate Inventory Labels
You have two ways to generate the inventory labels.
For Main Inventories:
If you want to generate the labels for your main inventories, follow the below steps.
- Navigate to the Inventories & Warehouses by clicking on the Inventories link in the sidebar.
- You'll now see a list of all the main inventories that exists in the system. Click "See Details" button to go on the inventory details page.
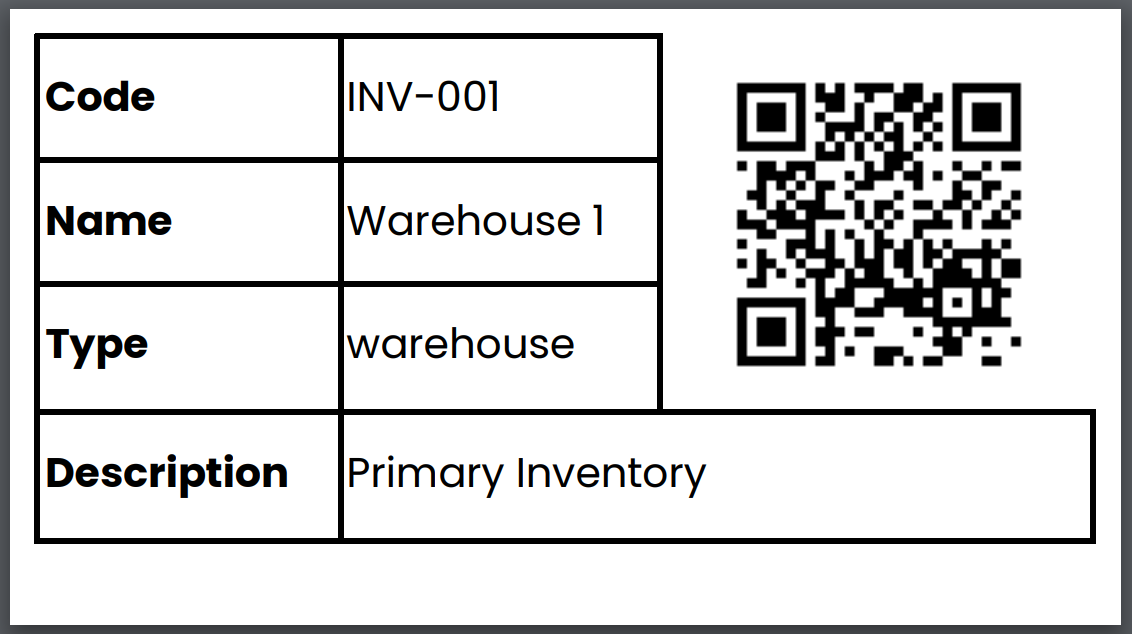
- Click the "Print Label" button to generate the label PDF.

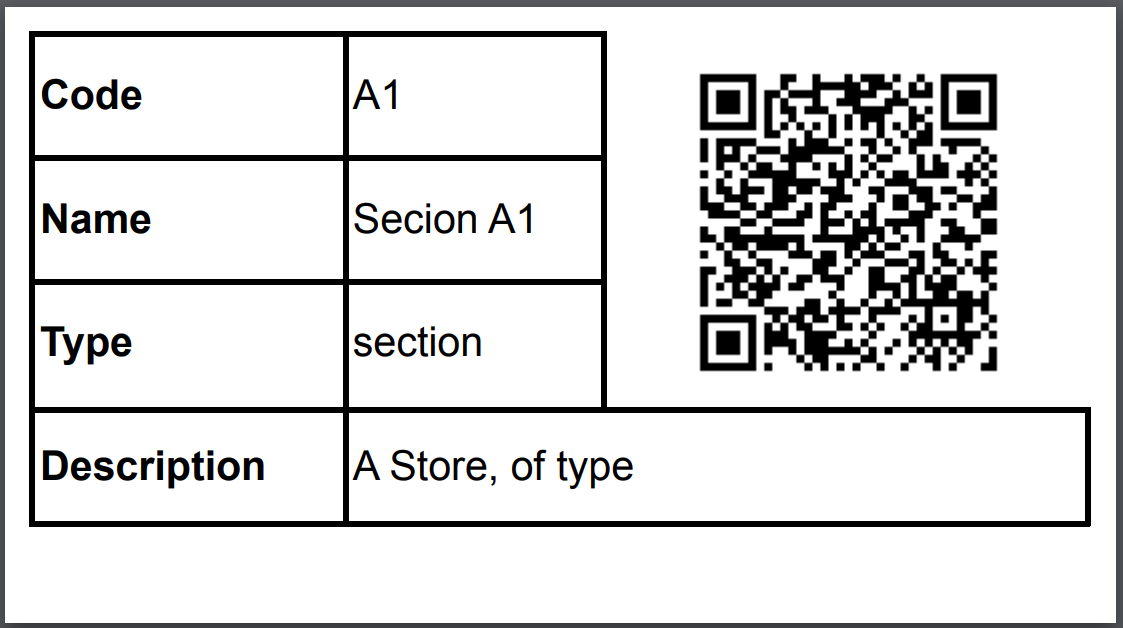
- It will generate a label like shown in the below screenshot.
For Sub-Inventories:
If you want to generate the labels for your sub-inventories, follow the below steps.
- Navigate to the Inventories & Warehouses by clicking on the Inventories link in the sidebar.
- You'll now see a list of all the main inventories that exists in the system. Click the "Warehouse Designer" button to open the warehouse designer for this inventory.
- You'll now see this inventory and its sub-inventories in a chart view. Click on the inventory card whose label you want to generate.
- It will open up a edit inventory dialog which now also have a button to print its label.
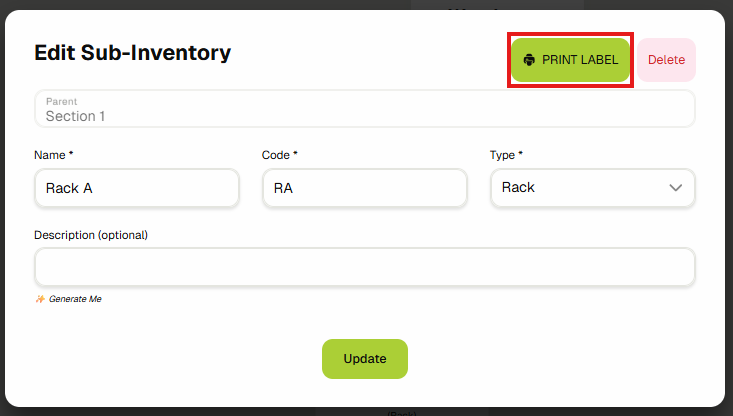
- Clicking on the "Print Label" button would generate a label like shown in the below screenshot.
Using Inventory Labels In Scanner
Once you have your inventory labels, you can easily scan them in the inventory fields available across ERP. It will automatically select the correct inventories and its sub-inventories without you needing to manually do it.
Let's say you want to fill up the "Picking From (Inventory)" field to choose the "A1" sub-inventory.
You can do it manually by selecting its parent Warehouse 4 then Section A and then A1 or You can click the scanner button next to the field.

It will load up a camera view. The camera may take a few seconds to load the first time...
Once its ready, scan the QR code and your inventory field will be populated with the correct inventories and sub-inventories without you needing to manually select them.

Waste Incidents
In this guide, you'll learn about Waste Incidents, a way to record and track wasted stock such as damaged, expired, or unusable materials in the system.
Navigate to Waste Incidents
-
Navigate to the Inventories & Warehouses by clicking on the Inventories link in the sidebar.
-
Click on the Waste Incidents button to go to the Waste Incidents List View page.
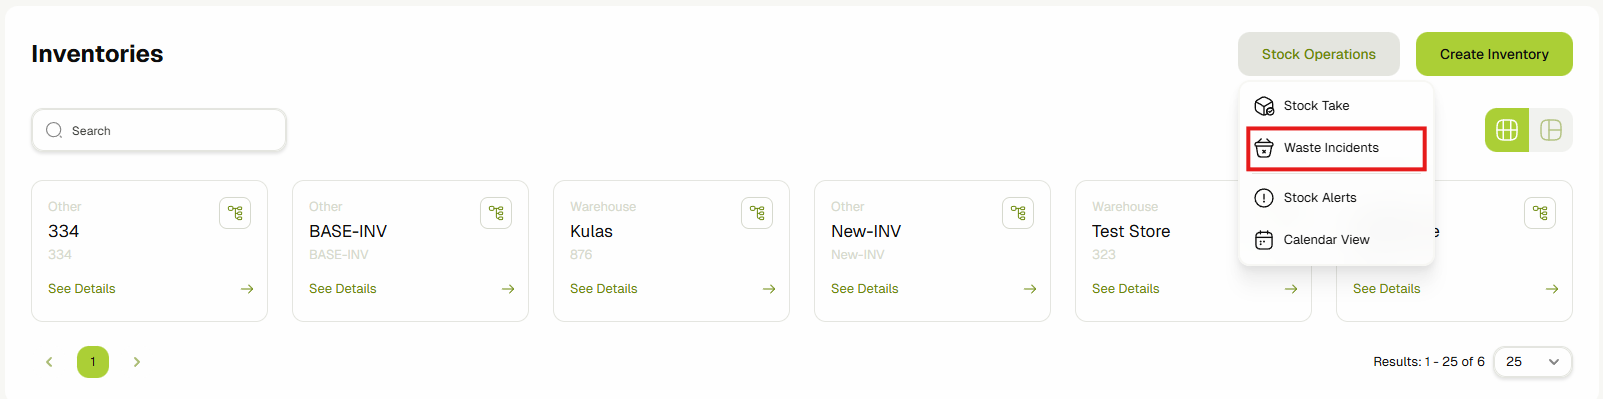
-
You'll see a list of all the recorded wasted incidents.
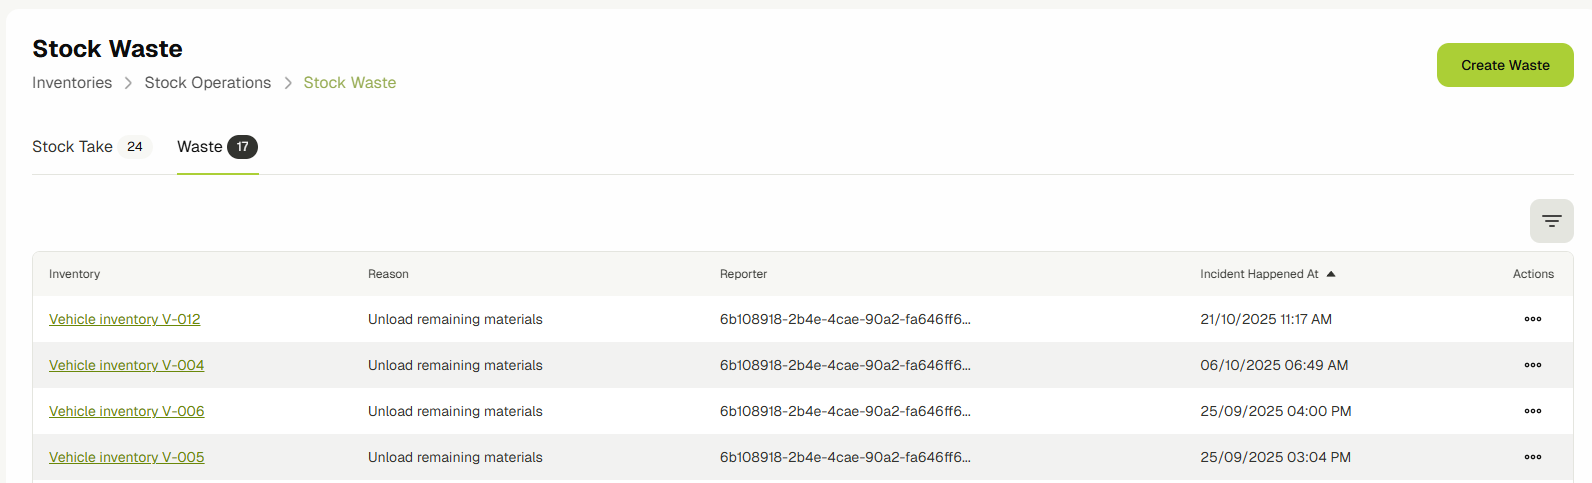
-
Click on the Add Waste Incident button to create a new waste incident.
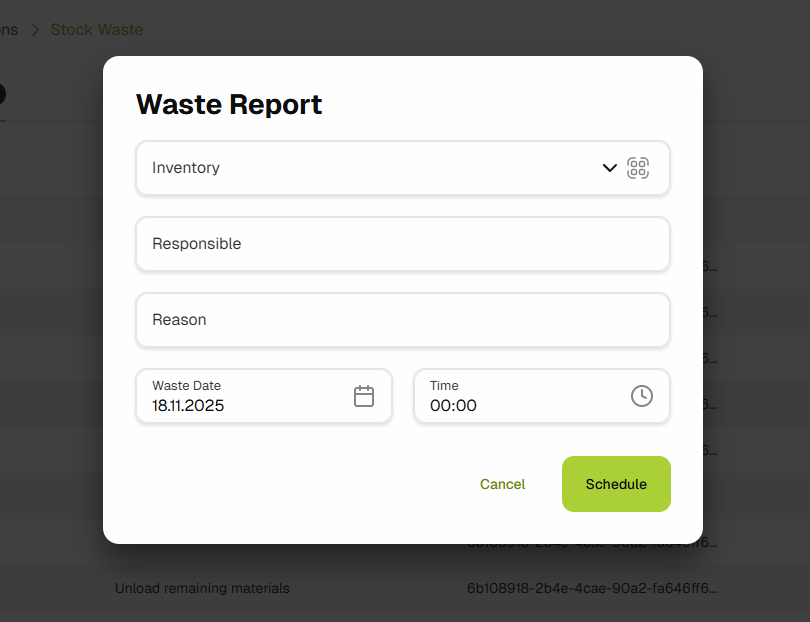
-
Select the Inventory or sub-inventory and click on the Add button to waste materials from that inventory.
It will show you how much of that material is present in the selected inventory and you can input how much you want to waste. You can also attach an image to each material that you're going to waste.
Fill out the other fields like Who, Why and When the incident happened.
-
Once done, click the Save Waste Incident Report button.
-
The incident will be recorded and the wasted amount will be removed from that inventory.

-
You can verify that the stock has been removed by visiting the inventory details page and viewing the stock. As you can see in the below screenshot, 10 of the Chicken kebabs have been removed from the inventory.