Upsells
💸 The Upsells section in GMS allows staff to create revenue-driving offers for guests, control where those offers appear, and manage the resulting upsell requests from one place.
📍 Accessing Upsells
- Log in to the GMS dashboard with a staff or manager account that has access to upsells.
- Open the Upsells section from the main dashboard navigation.
Once opened, you can manage existing upsell offers, create new ones, and review their performance.
📋 Viewing and Managing Upsell Offers
-
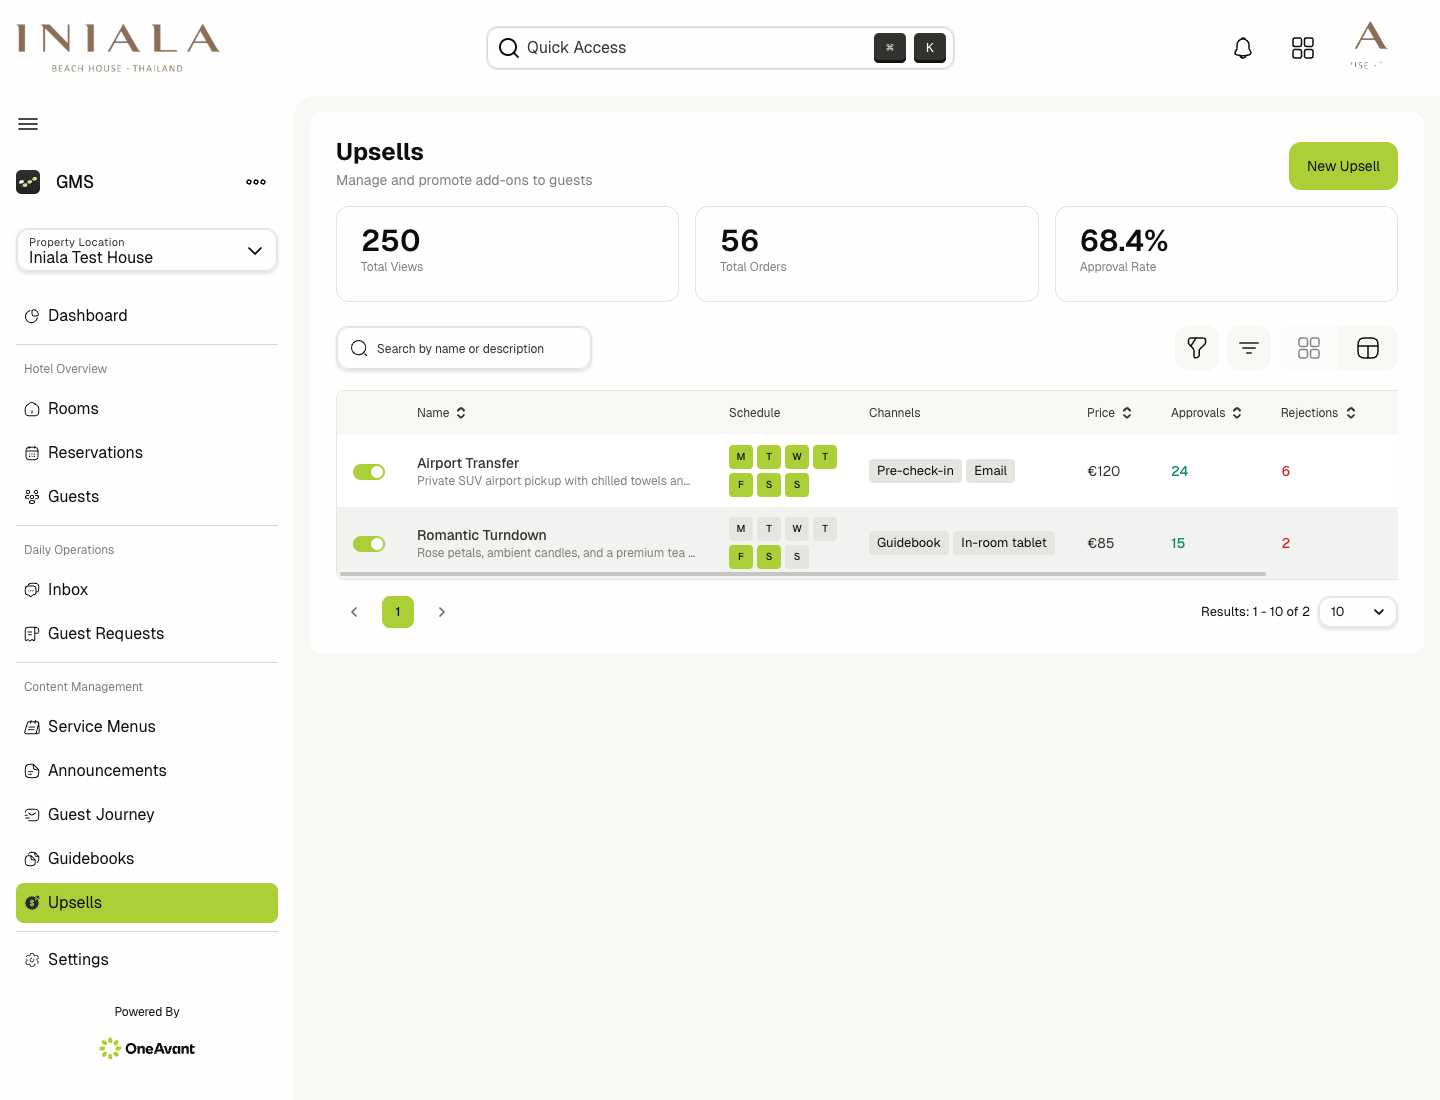
The upsell management page shows all created offers with key information such as the offer title, status, assigned channels, and availability rules.
-
You can switch between list view and card view, depending on how you prefer to browse offers.
-
Use the search bar to quickly find an upsell by name.
-
Use the filters to narrow the results by:
- Enabled or disabled status
- Assigned channel such as pre-check-in, email, or guest-facing surfaces
- Availability rules such as room-type restrictions or schedule rules
-
Each upsell includes actions that let you view, edit, or delete the offer.
-
Opening an upsell also gives staff access to its basic performance metrics, including:
- Views
- Orders
- Approvals
- Rejections
➕ Creating or Editing an Upsell
-
Click Create Upsell to add a new offer, or open an existing upsell and choose Edit.
-
Fill in the upsell details, such as:
- Title
- Description
- Price
- Image
- Assigned channels
- Availability rules
-
Save the form to publish the new or updated upsell to the system.

Typical availability and targeting rules include:
- Showing the offer only for selected room types
- Restricting the offer to selected days
- Choosing where the offer should appear, such as:
- Pre-check-in
- Dedicated upsell email
- Guest-facing surfaces such as guidebooks or tablet/home experiences
Guests only see upsells that are enabled, assigned to the current channel, and compatible with the reservation's availability rules.
🌐 Upsell Translations
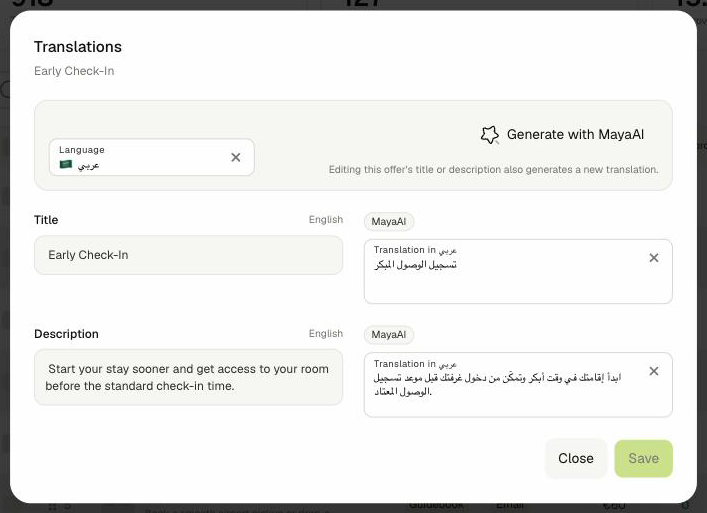
Each upsell's Title and Description can be shown to guests in their own language. They are translated automatically when you create the upsell or change its title or description.
To review or edit the translations:
-
Switch the upsells list to the table view with the view toggle next to the filter icon. The card view doesn't show translations.
-
Click the Translations icon on the upsell's row.
-
Select a Language from the dropdown. The English text appears on the left and the translation on the right.
-
Edit any Translation in field, or click Generate with MayaAI to translate both fields into every supported language at once.
-
Click Save.
If you switch language or close the dialog with unsaved edits, the dashboard asks you to confirm. Click Keep editing to go back and save.
MayaAI never replaces wording your team has edited. To let MayaAI translate a field again, clear it and click Save. Editing translations requires the Manage Upsells permission. For labels and supported languages, see Translating Your Content.
🤝 Upsells During Pre-Check-In
-
When a guest reaches the upsell step in the pre-check-in flow, the system only shows offers assigned to the pre-check-in channel.
-
Guests can move through the offers one by one and either:
- Swipe to accept or skip an upsell
- Use the on-screen select or reject actions
-
After reviewing the offers, guests are shown a review step where they can see all offered upsells, change their selections, and continue.
-
Before submission, the guest sees a final summary with:
- The selected upsells
- The total price
-
After submission, the selected upsells are created in the system as upsell requests.
📧 Upsells Through the Dedicated Email Flow
-
If the dedicated upsell email channel is enabled, guests can receive an email with an Enhance your stay action.
-
That link opens a focused upsell web view that contains only the upsell-selection flow.
-
In this flow, guests can:
- View only offers assigned to the email channel
- Review their selected upsells
- Confirm the total price
- Submit the selected offers as upsell requests
The dedicated email flow is separate from pre-check-in, but the guest selection and submission experience follows the same idea: review offers, confirm selections, and submit requests.

🧾 Viewing Purchased Upsells in Guest Pre-Check-In Data
-
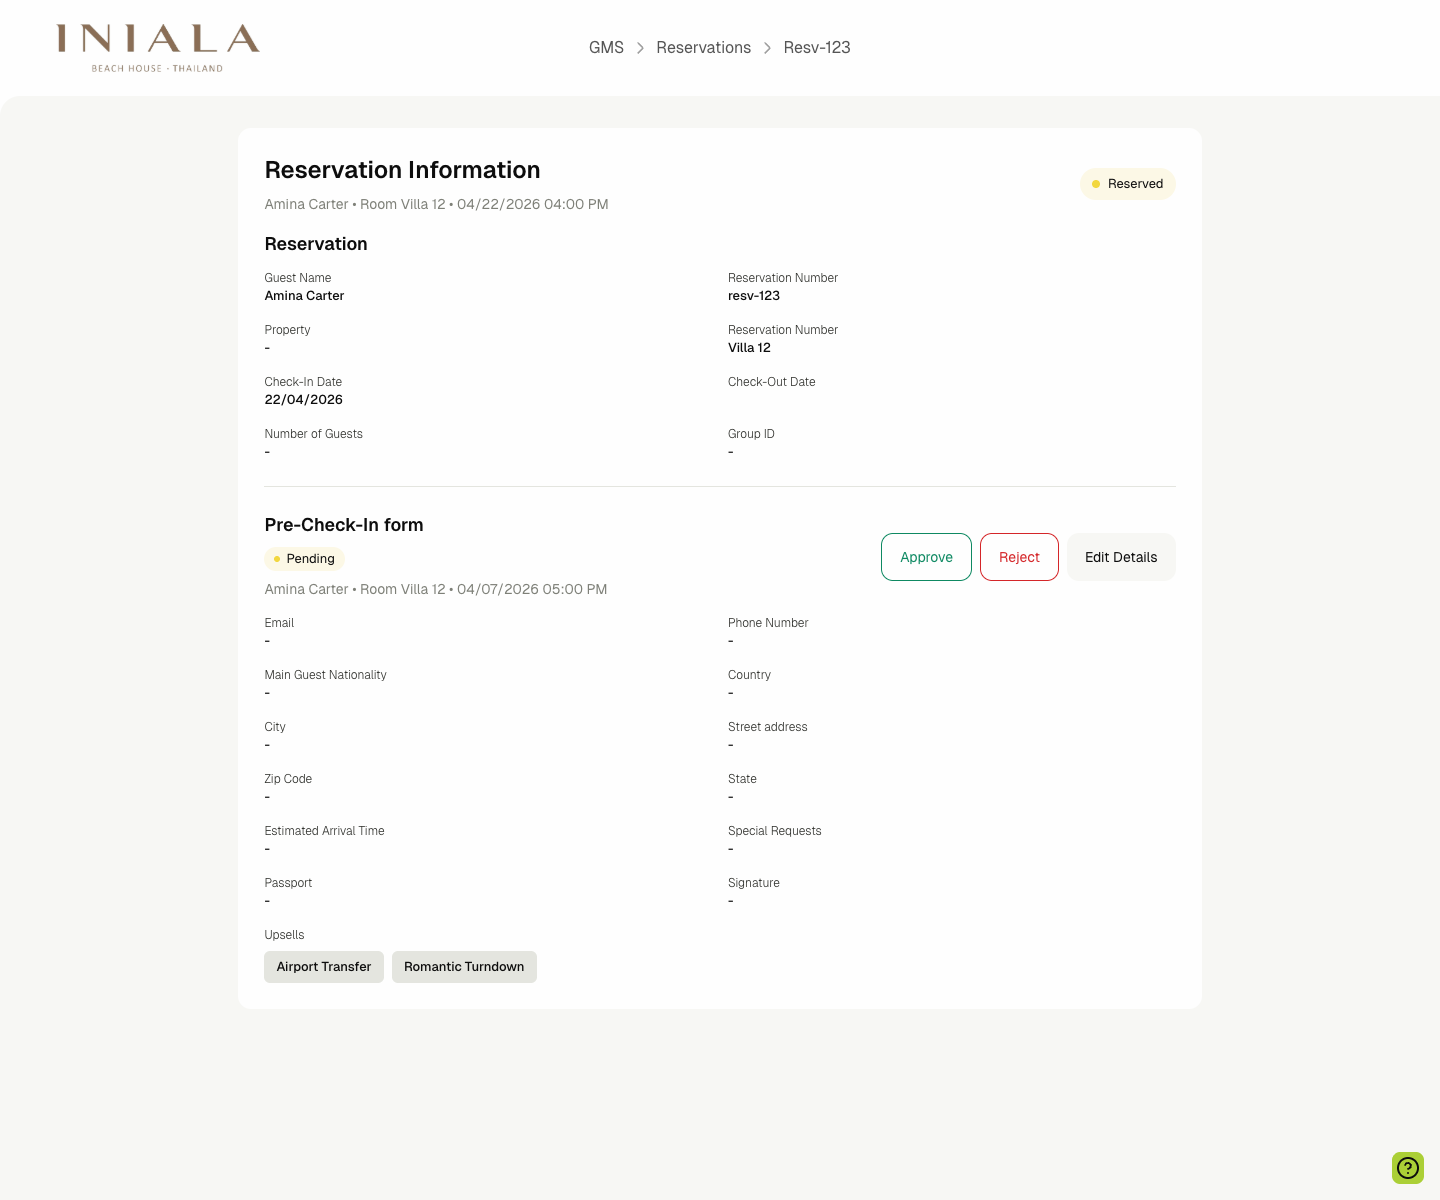
Staff can review a guest's submitted upsells directly from that guest's pre-check-in data.
-
If the guest selected one or more upsells, the page shows a list of the purchased offers with their details.
-
From there, staff can click View in Requests to jump directly to the guest requests page with the upsell tab already selected.
✅ Managing Upsell Requests
-
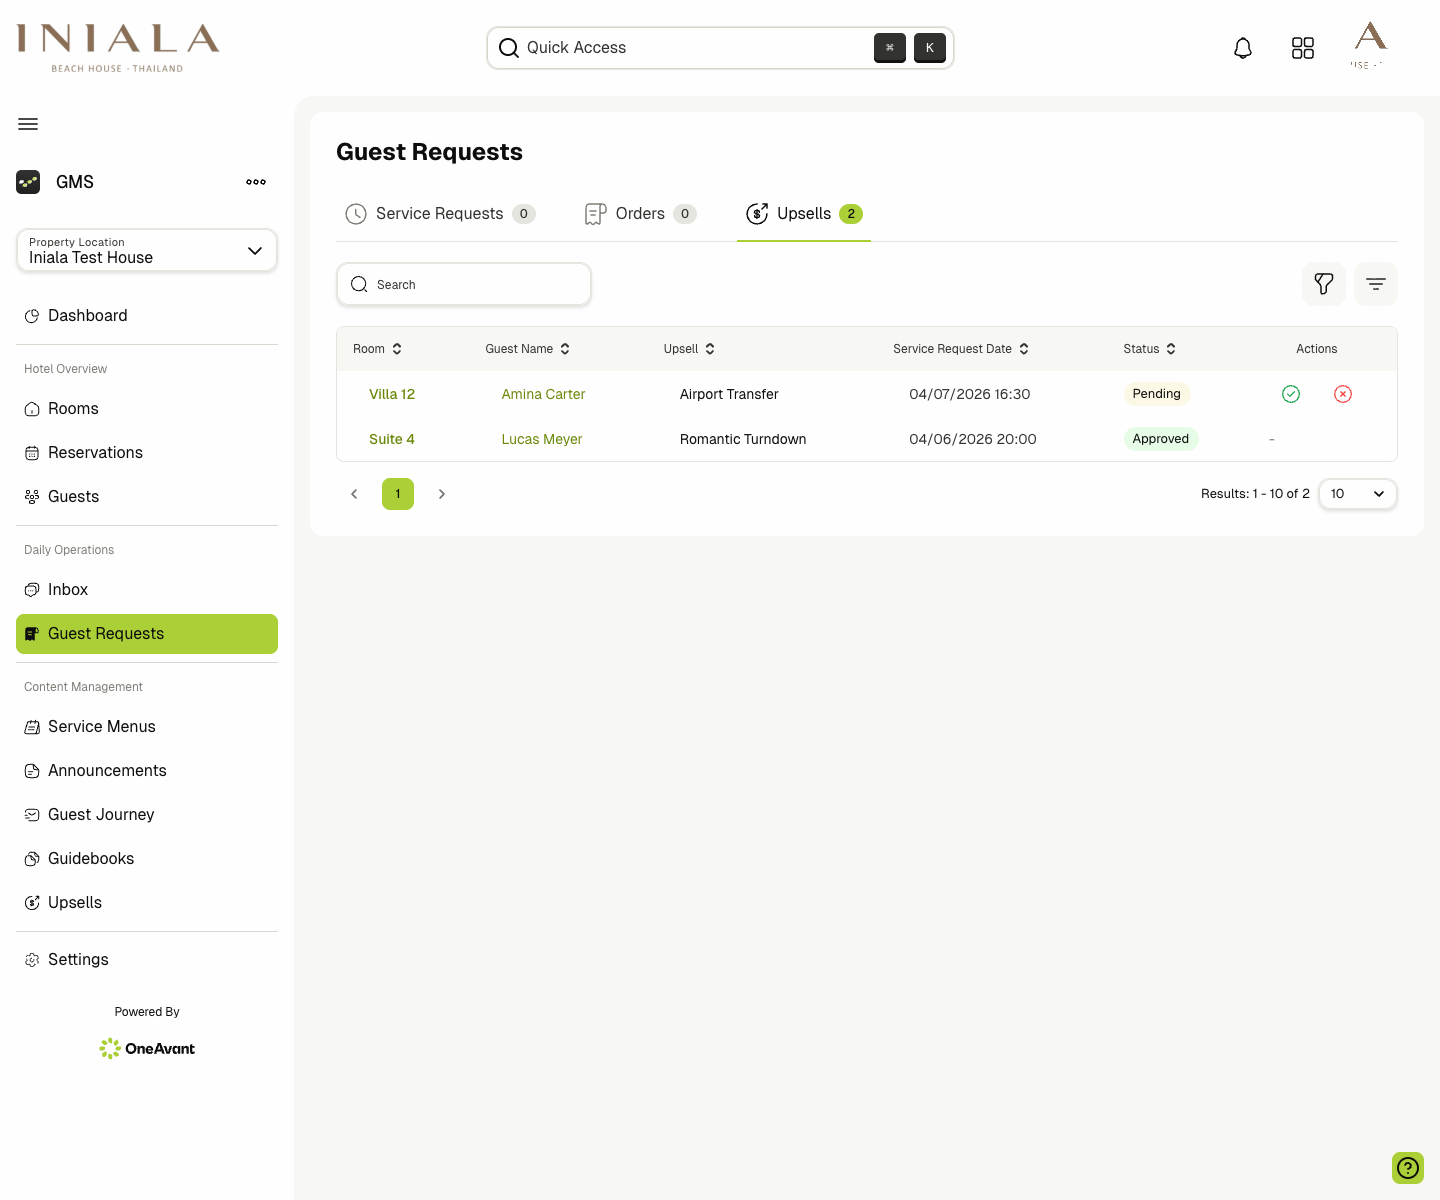
Submitted upsells appear in the guest requests area as upsell requests.
-
Staff can review each request and update its status from the upsell requests workflow.
-
Depending on the situation, staff can:
- Approve the request
- Reject the request
-
If rejection reasons are enabled for your workflow, staff can record a reason while rejecting the request so the action is easier to track internally.
-
Once updated, the request status is reflected in the requests workflow and in the related guest journey data.
🔔 Notifications
-
When a guest submits an upsell, the relevant staff members are notified based on the property's notification setup.
-
This helps teams act quickly on guest requests and approve or reject offers without leaving the GMS workflow.